Algolia Recommend
On this page
Algolia Recommend lets you display recommendations on your website to encourage your users to expand their search and browse more broadly. If the item they’re looking at isn’t what they were searching for they can quickly jump to similar items or find items that would complement their current selection.
Algolia Recommend offers two recommendation models:
- Frequently Bought Together
- Related Products
This feature is in beta. By joining the beta program, you understand that Algolia Recommend might not work for your use case. When reaching the General Availability status, this feature will be available and billed as a separate product.
Algolia Recommend generates recommendations by looking at:
- Your data indexed into Algolia
- Your users’ interactions captured through the Insights API
Under the hood recommendations rely on supervised machine learning models and the Algolia foundation.
Frequently Bought Together
Frequently Bought Together recommends items that are often bought together. For a given item, it recommends a list of items based on the conversion events your users perform on your platform.
The Frequently Bought Together model recommends up to 3 items.
Related Products
Related Products recommends items that are related to each others. For a given item, it returns a list of items based on the clicks and conversion events your users perform on your platform.
The Related Product model recommends up to 30 related items.
Getting started
Getting recommendations is a four-step process:
- Sending your data
- Capturing your users events
- Training the models
- Building your recommendation UI
Sending your data
Before you can get recommendations, you need to send your data to Algolia. Algolia provides recommendations based on the data in your index, which Algolia hosts on its servers.
If you didn’t send your data to Algolia yet, there’re a full section you can follow to do so.
Capturing your users events
There are two families of user events you can capture with the Insights API:
- Events that happened following an interaction with Algolia results
- Events that happened following an interaction unrelated to Algolia results
Events can have the following types:
- Clicks
- Conversions
Algolia Recommend models use both types of events. You can follow the guide explaining how to send users events to Algolia to help you set it up on your platform.
Training the models
The first thing you have to choose is which models you are interested in. Using both Frequently Bought Together and Related Products at the same time is also possible.
Recommendations are refreshed every 24 hours and use your users’ interactions from the last 30 days.
The setup process is the same for all models:
Select data source
You need to specify the main index containing the items you want to generate recommendations for.
Collect Insights events
The underlying models use the events made on the index specified on the “select data source” step.
- Frequently Bought Together uses conversions where a user purchases two or more items on the same day. This model requires at least 1,000 conversions of this type, within the last 30 days.
- Related Products uses both clicks and conversions. This model requires at least 10,000 events in the last 30 days.
If the minimum number of Insights API events sent to the selected index isn’t reached, an error message is displayed and the model training can’t start.
If you are sending events and get an error, check out the guide explaining how to validate and debug events.
Machine learning models
Once the previous steps are done you can click on the “Start training” button to start generating the recommendations.
This step can take several hours, usually around 1 to 2 hours.
Once completed, you are able to know:
- The number of items for which the model generated recommendations
- The coverage: the percentage of items recommended over the full catalog
- The rank awareness: the model’s ability to put relevant items high up in the list of recommendations list
- The achieved confidence: the model’s confidence in the relevance of recommendations
For the beta, the recommendations are stored in a regular index that follows this convention: ai_recommend_$modelName_$sourceIndexName.
For example:
ai_recommend_bought-together_mysourceindexai_recommend_related-products_mysourceindex
The recommendation records follow this structure:
1
2
3
4
5
6
7
8
9
10
11
12
13
14
{
  "objectID": "D09203-9978-8674" // item having recommendations,
  "recommendations": [
    {
      "objectID": "D08410-336-1628",   // a recommended item
      "score": 25.64                   // confidence score for this recommendation
    },
    {
      "objectID": "D09201-9966-6444",
      "score": 25.64
    },
    ...
  ]
}
As the recommendations are stored within regular indices during the beta, they affect your records quota. Should this trigger some over-quota, please reach out to Algolia Support.
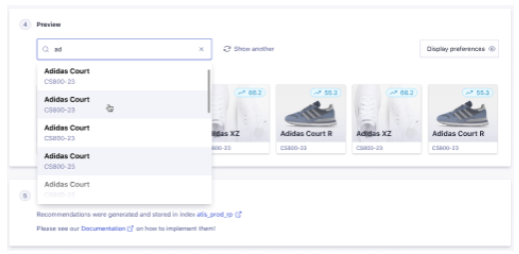
Preview
Once the model is trained you can preview its recommendations by searching any items from your index. Each recommendation displays the confidence score from the model.
Congratulations you’re done with the setup of Algolia Recommend. Now it’s time to display them on your websites.
Building your recommendation UI
Algolia Recommend leverages regular indices to store and retrieve recommendations. This means you can use Algolia’s Instant Search UI libraries to add recommendations on your website in a matter of minutes.
The Recommendations component is only available for React. Other front-end frameworks follow later and will be fully packaged for the Algolia Recommend GA release.
The first step is to install the @algolia/react-recommendations library:
1
npm install --save @algolia/react-recommendations@"^ 1.0.0-beta"
Import the Recommendations React component:
1
import { Recommendations } from "@algolia/react-recommendations";
On the page where you want to display the recommendations, typically a product detail page, add the following code:
1
2
3
4
5
6
7
8
9
10
11
12
13
14
15
16
17
18
19
20
21
22
23
24
25
26
27
28
29
30
31
32
33
34
35
36
37
38
39
40
import React, { Component } from 'react';
import {
  InstantSearch,
  Highlight,
  Configure,
  connectHitInsights,
} from 'react-instantsearch-dom';
import algoliasearch from 'algoliasearch';
import { Recommendations } from "@algolia/react-recommendations";

const searchClient = algoliasearch(
  'YourApplicationID',
  'YourSearchOnlyAPIKey'
);

const Hit = ({ hit, recommendations }) => {
  return (
    <div>
      <img src={hit.image_link} align="left" alt={hit.name} width={100} />
      <div className="hit-name">
        <Highlight attribute="name" hit={hit} />
      </div>
      <div className="hit-objectID">
        <p>{hit.objectID}</p>
      </div>
      <div className="hit-price">${hit.price}</div>
    </div>
  );
};

const App = () => (
  const App = () => (
    <Recommendations
      model={'related-products'}
      searchClient={searchClient}
      indexName={'your_source_index_name'}
      objectID={item.objectID}
      hitComponent={(props) => Hit(props)}
    />
);
modelis used to decide which type of recommendation you want to display. It can be eitherbought-togetherorrelated-products.indexNameis the name of the index containing your items details. This is the same as the one configured as a data source in the Recommend dashboard.item.objectIDhas to be replaced dynamically by the objectID you want to display recommendations for.hitComponentis the template you want to use to display your items recommendations. The template receives the hit attributes of the recommended item, as well as the confidence score the model computed for that recommendation.
If you are an Algolia Search customer, adding recommendations to your website can be done in just six lines of code:
1
2
3
4
5
6
7
8
9
import { Recommendations } from "@algolia/react-recommendations";
import { searchClient, Hit } from "your/instantsearch/implementation.js";

<Recommendations
  searchClient={searchClient}
  model={'related-products'}
  indexName={'your_source_index_name'}
  objectID={item.objectID}
  hitComponent={Hit} />
Under the hood this widget is retrieving your items details by doing a call to the search API on the specified index.
Passing filters at query time
It can be convenient to apply some filters to the recommendations. For instance to ensure that no out of stock products are recommended, or to make sure recommendations belong to the same parent category. You can do this by using the facetFilters attribute.
1
2
3
4
5
6
7
8
9
10
11
12
<Recommendations
      model={'related-products'}
      searchClient={searchClient}
      indexName={'your_source_index_name'}
      objectID={item.objectID}
      hitComponent={(props) => Hit(props)}
      maxRecommendations={5}
      facetFilters={[
        `hierarchical_categories.lvl0:${this.state.selectedProduct.hierarchical_categories.lvl0}`,
        'inStock:true'
      ]}
    />
Choosing the number of recommendations
If the models have enough users data to work with for a given product, they produces a maximum of:
- 3 recommendations for the Frequently Bought Together model
- 30 recommendations for the Related Products model
You can change this number to suit your needs by using the maxRecommendations attribute:
1
2
3
4
5
6
7
8
<Recommendations
      model={'related-products'}
      searchClient={searchClient}
      indexName={'your_source_index_name'}
      objectID={item.objectID}
      hitComponent={(props) => Hit(props)}
      maxRecommendations={5}
    />
Having results even if no recommendations were computed by the model
It can happen that the models isn’t able to compute any recommendation because of lack of click and conversion events. In that case, you can decide to fallback on content-based recommendations leveraging your Algolia index. You can do this using the fallbackFilters attributes.
1
2
3
4
5
6
7
8
9
10
11
<Recommendations
      model={'related-products'}
      searchClient={searchClient}
      indexName={'your_source_index_name'}
      objectID={item.objectID}
      hitComponent={(props) => Hit(props)}
      maxRecommendations={5}
      fallbackFilters={[
        `hierarchical_categories.lvl2:${this.state.selectedProduct.hierarchical_categories.lvl2}`,
      ]}
    />
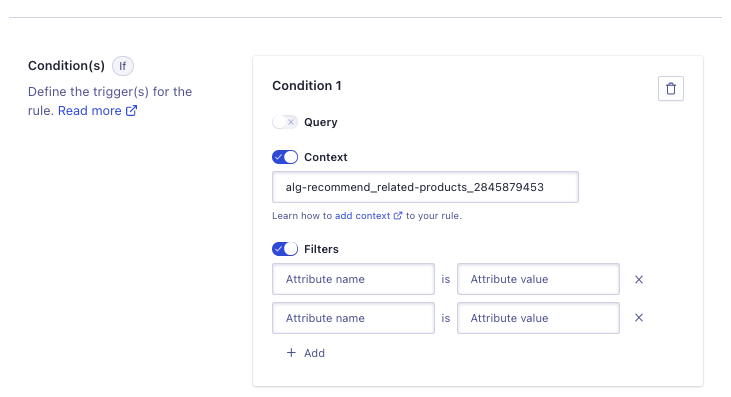
Using Rules to pin a particular product for a given recommendation
During the beta, you can use Rules to choose which items you want to recommend for a particular item.
Under the hood, the Recommendation widget sends a ruleContext on each request that follows this convention: alg-recommend_${model-name}_${objectID}.
model-name can be either bought-together or related-products depending of the model you’re using.
You can use this context to trigger Rules to pin or hide items in the same way you would do for your search results.
Getting analytics
By default, using the widget code provided in this tutorial, no requests are taken into account in your analytics as it targets the same index as your search experience.
To activate this behavior add the analytics attributes to your widget declaration.
1
2
3
4
5
6
7
8
<Recommendations
      model={'related-products'}
      searchClient={searchClient}
      indexName={'your_source_index_name'}
      objectID={item.objectID}
      hitComponent={(props) => Hit(props)}
      analytics={true}
    />
Under the hood, all the requests coming from the recommendation widget are identified with an analyticsTags so you can find them back on the analytics dashboard.
- Requests sent from the related products widgets use the
alg-recommend_related-productstag - Requests sent from the bought together widget use the
alg-recommend_bought-togethertag
Distinguish search and recommendation analytics
As both Algolia Search and Algolia Recommend requests target the same index, you need to add an analyticsTags to your searches if you want to distinguish the performances of the search from the recommendations. For example, you can add search in the analyticsTags on all your search requests.
Getting Click and Conversion Analytics of the recommendations
In order to get Click and Conversion Analytics you need to capture the clicks and conversions related to the recommendations that are happening on your websites. Similarly to what you did for your search results, you can add clicks and conversions tracking on recommendations.
Here is an example using React InstantSearch:
1
2
3
4
5
6
7
8
9
10
11
12
13
14
15
16
17
18
19
20
21
22
23
24
25
26
27
28
29
30
31
32
33
34
35
36
37
38
39
40
41
42
43
44
45
46
47
48
49
50
51
52
53
54
55
56
57
58
59
60
61
62
63
import React, { Component } from 'react';
import {
  InstantSearch,
  Configure,
  connectHitInsights,
} from 'react-instantsearch-dom';
import algoliasearch from 'algoliasearch/lite';
import { Recommendations } from '@algolia/react-recommendations';

const aa = require('search-insights');
aa('init', {
  appId: 'YourApplicationID',
  apiKey: 'YourSearchOnlyAPIKey',
});

const searchClient = algoliasearch(
  'YourApplicationID',
  'YourSearchOnlyAPIKey'
);

const Hit = ({ hit, recommendations, insights }) => {
  return (
    <div>
      <img src={hit.image_link} align="left" alt={hit.name} width={100} />
      <div className="hit-name">{hit.name}</div>
      <div className="hit-objectID">{hit.objectID}</div>
      <div className="hit-price">${hit.price}</div>
      <button
        onClick={() =>
          insights('clickedObjectIDsAfterSearch', {
            eventName: 'Product Clicked',
          })
        }
      >
        See details
      </button>
      <button
        onClick={() =>
          insights('convertedObjectIDsAfterSearch', {
            eventName: 'Product Added To Cart',
          })
        }
      >
        Add to cart
      </button>
    </div>
  );
};

const HitWithInsights = connectHitInsights(aa)(Hit);

const App = () => (
  const App = () => (
    <Recommendations
      model={'related-products'}
      searchClient={searchClient}
      indexName={'your_source_index_name'}
      objectID={item.objectID}
      hitComponent={HitWithInsights}
      analytics={true}
      clickAnalytics={true}
    />
);
