Federated Search
On this page
This guide uses an outdated version of Autocomplete. Algolia recommends using Autocomplete v1 instead.
Federated search is a popular search and discovery pattern that displays relevant results from multiple data sources on the same page. Ideally, the page uses different layouts to best present each type of content. The benefit from a user’s perspective is that a single query multiplies their options. This encourages them to browse and discover more of your online business.
Check out a series of articles that showcase the business value of federated search. The series starts with: What’s federated search?. Please refer to the live demo for a complete sample implementation.
Requirements
| Difficulty |
|
| Prerequisites | Instant Search 4+ |
Implementation guide
Any business in any industry can leverage federated search. For example, an online journal can divide news into different categories (a single screen with international, sports, and editorials), and a SaaS company can divide its online services into apps, platforms, and articles or FAQs.
In this guide, you use an online electronics store as an example for federated search.

Using one or more indices
Many implementations of federated search use multiple indices for their search. This is because different content types normally require different data structures, and therefore different indices. For example, products and product reviews require two indices: a product index and a separate reviews index.
However, federated search doesn’t require you to use multiple indices. Even though a federated search displays multiple results, you can filter (or contextualize) a single index to create these different result sets. For example, you can query a single index that contains both movies and books twice, once with a filter on books, and once with a filter on movies.
Here is the most common flow of information:
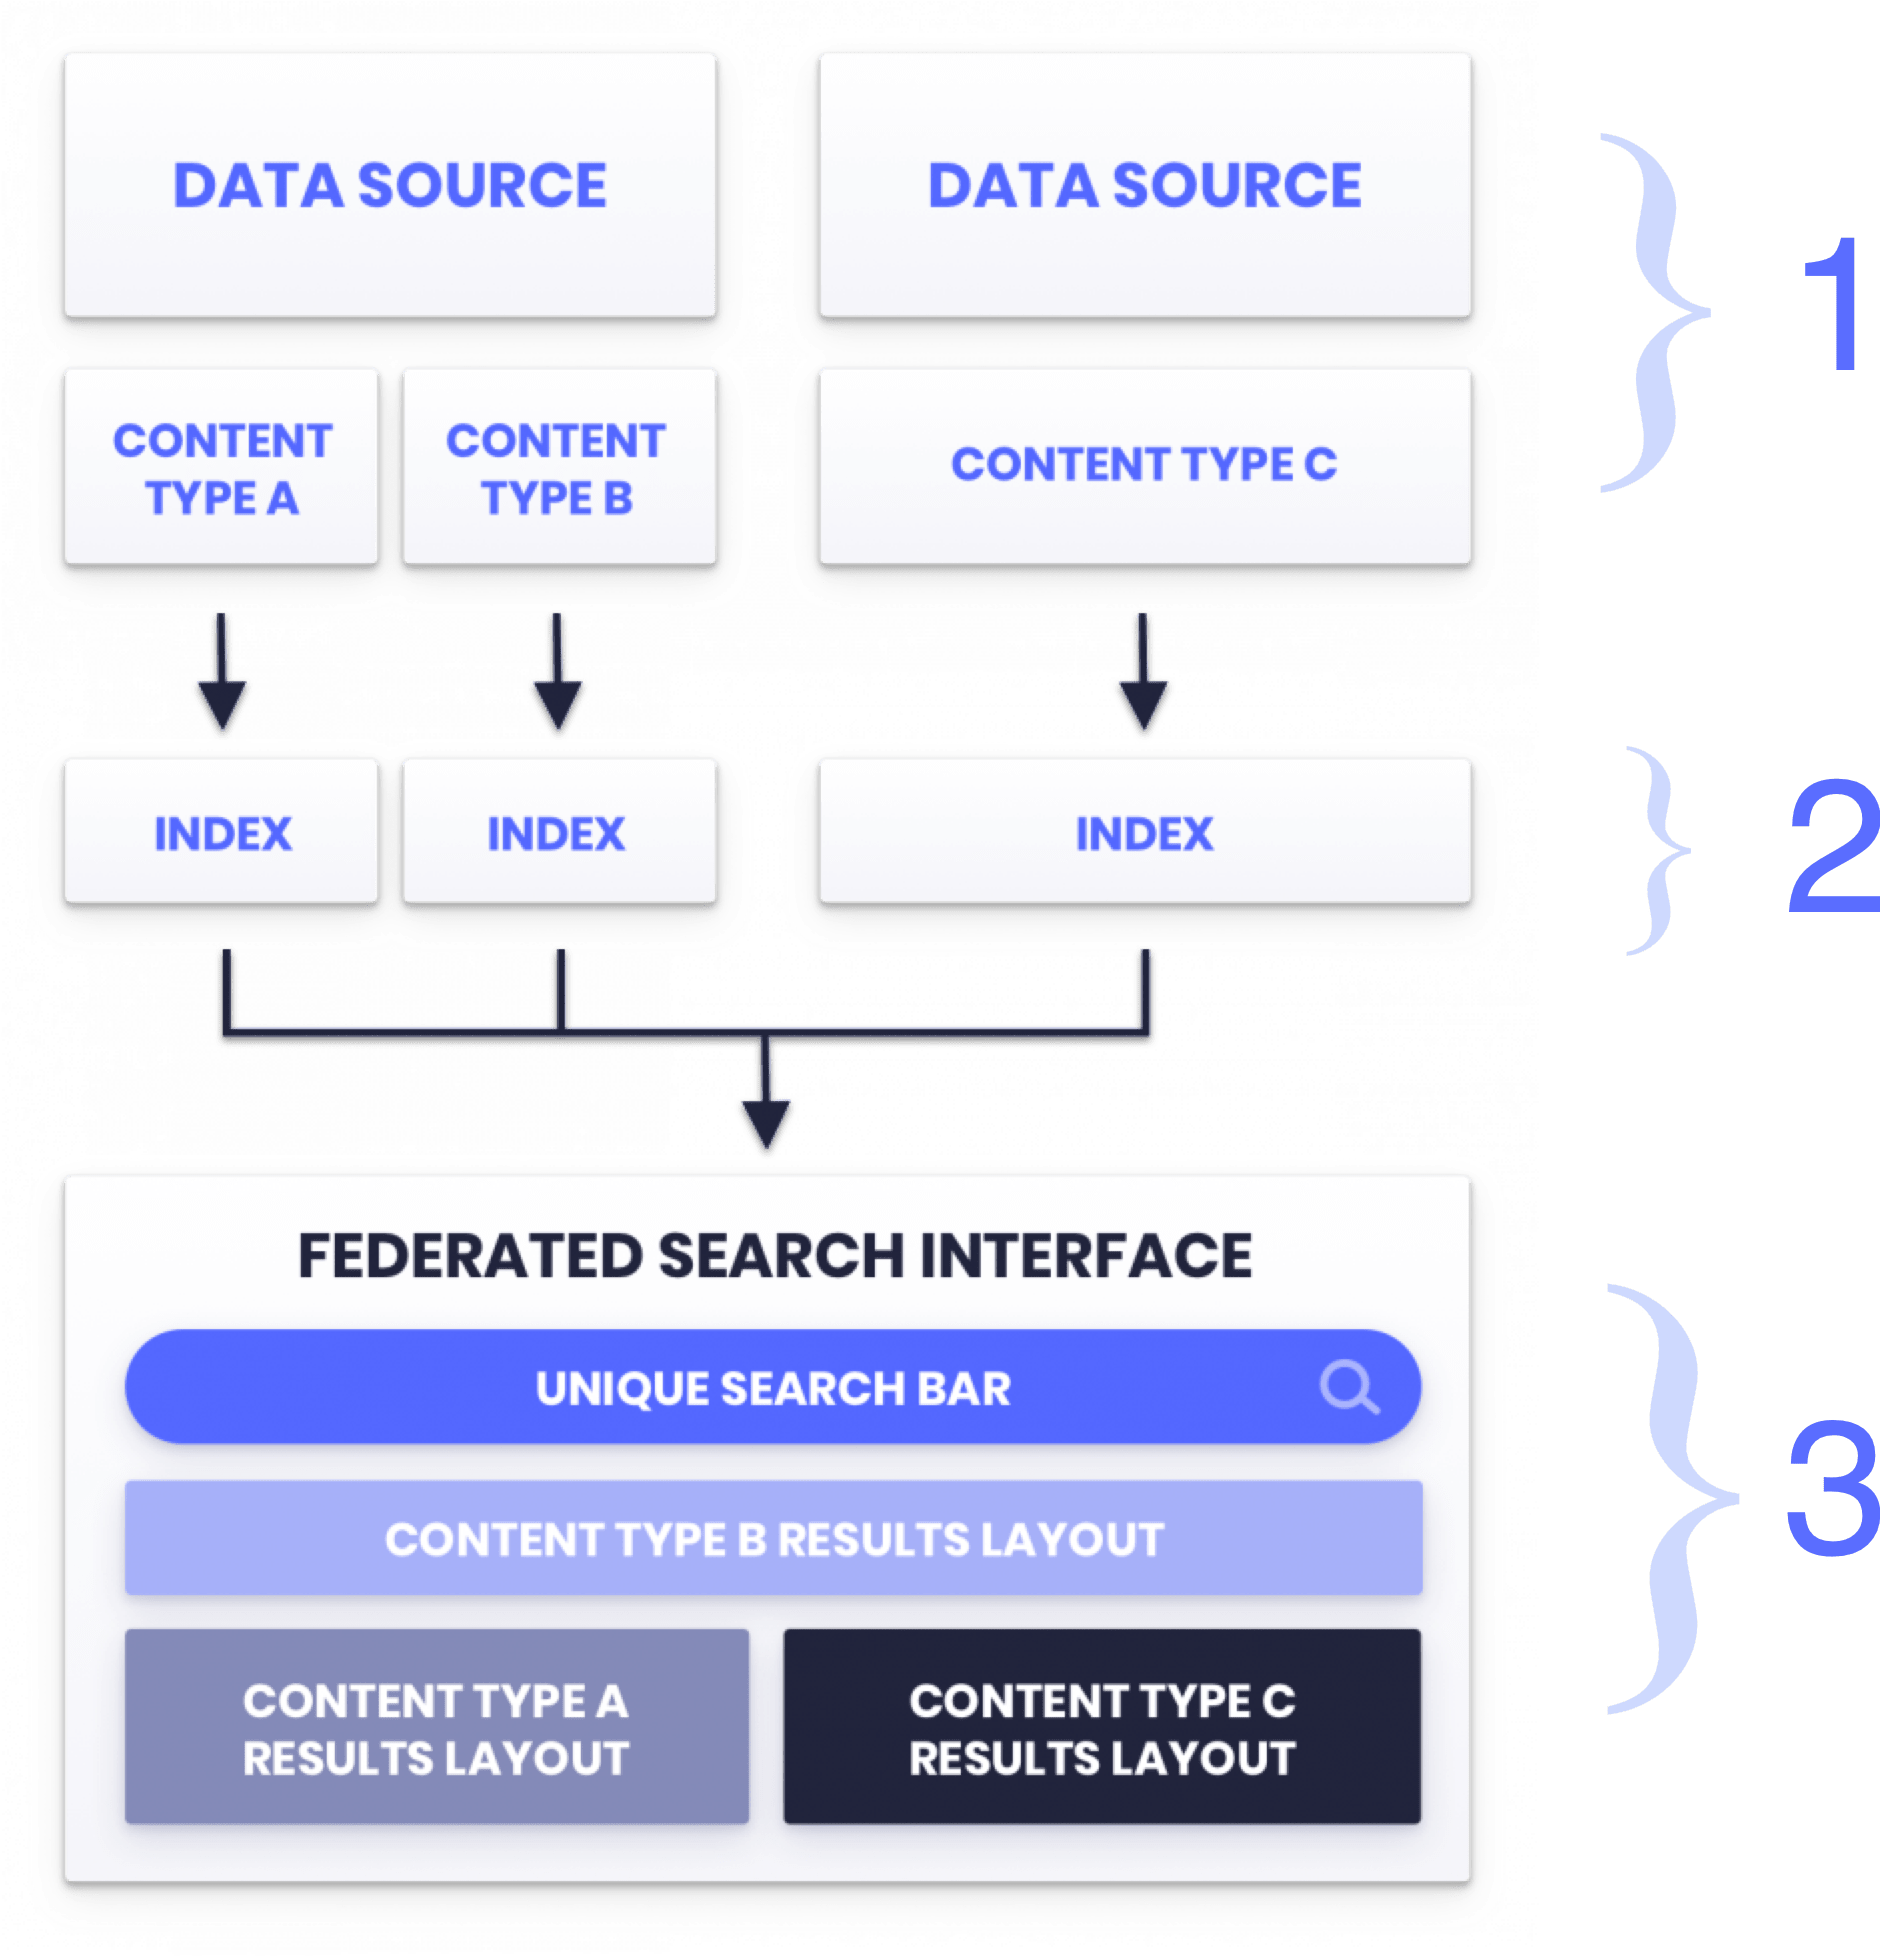
- You have multiple data sources. For each data source, create an index.
- Federated search searches in each index, or in a single index with different filters.
- The search interface uses a single search bar, and displays the different type of results in different ways in the same interface.
File and index structure
For this implementation, you need three files:
index.htmlsrc/style.csssrc/main.js
You also need two Algolia indices:
- One index containing the product data set. Call this index
instant_search. - One Query Suggestions index, named
suggestionsin this guide.
High-level overview
To create a federated search, you need to do the following:
-
Display a single search bar and send the query to Algolia with every keystroke, like a regular search interface.
-
Send the query to Algolia for each type of content, simultaneously. The demo makes two simultaneous search queries.
-
Receive the response for each query and display the results of each response. The demo displays the results in the first two columns.
-
As part of the search in the main index, the response contains the. The demo displays the facets in the third column.
The HTML - creating a combined layout
The demo’s federated search experience has three columns. The first column displays the suggestions from the Query Suggestions index. The second column presents the products from the main index. The third displays the facets (refinements).
The display logic is as follows:
-
Place a single container with the class
federated-results-containerinside the search bar widget container. This helps display the results right underneath the search bar. -
Place three containers inside
federated-results-container(one for each column):- A column with the ID
suggestions. This holds the Query Suggestions. - A column with the ID
products. This holds the products. - A column with the ID
categories. This holds the facets.
- A column with the ID
1
2
3
4
5
6
7
8
9
10
11
12
13
14
15
16
17
18
19
<div class="searchWidget widget">
  <!-- any additional content you want to display -->
  <div class="federated-results-container">
    <div class="column">
      <h2>Suggestions</h2>
      <div id="suggestions"></div>
    </div>
    <div class="column">
      <h2>Products</h2>
      <div id="products"></div>
      <a href="#">See more products</a>
    </div>
    <div class="column">
      <h2>Categories</h2>
      <div id="categories"></div>
    </div>
  </div>
  <!-- any additional content you want to display -->
</div>
The CSS - creating a column layout
The layout is central to a federated search interface. You use CSS to create unique layouts for each result set.
Up to this point, you’ve used the HTML to divide up the screen into three parts. Now, you use the CSS to turn those elements into three columns. For this, you use the classes .federated-results-container and .federated-results-container .column.
Here is a skeleton view of your CSS file:
1
2
3
4
5
6
7
8
9
10
11
12
13
14
15
16
17
18
19
20
21
22
23
24
25
26
27
28
29
30
31
32
33
34
35
36
37
38
39
40
41
42
43
44
45
46
47
48
49
50
51
52
53
/*
 FEDERATED SEARCH BOX STYLE
*/

.federated-results-container {
  width: 150%;
  position: absolute;
  top: 100%;
  left: 50%;
  transform: translateX(-50%);
  background: linear-gradient(
      -180deg,
      hsla(0, 0%, 100%, 0),
      hsla(0, 0%, 100%, 0.8)
    )
    #ebecf3;
  box-shadow: 0 20px 44px 0 rgba(0, 0, 0, 0.2);
  border-radius: 8px;
  display: grid;
  grid-template-columns: 1fr 2fr 1fr;
  display: none;
}

@media (max-width: 1130px) {
  .federated-results-container {
    width: 100vw;
  }
}

.federated-results-container .column {
  text-align: left;
  font-weight: normal;
  position: relative;
  padding: 12px 16px;
}

.federated-results-container .column:not(:last-child)::after {
  content: '';
  position: absolute;
  top: 0;
  right: 0;
  width: 1px;
  height: 100%;
  background-color: #aaa;
  opacity: 0.5;
}

.federated-results-container .column h2 {
  font-weight: normal;
  font-size: 24px;
  margin-bottom: 16px;
}
The JavaScript - making the search interactive
For the federated search, use the index widget to query a specific index, and add additional widgets for the configuration and templates.
The first step is to create an InstantSearch instance, and add all its relevant widgets. Assign the InstantSearch instance to a variable search. The widgets you add are the searchBox widget, two index widgets, and a federatedRefinement widget which you create from scratch.
Here’s a skeleton view of what you’re doing:
1
2
3
4
5
6
search.addWidgets([
  searchBox({ /* search box */}),
  index({ /* products */ }),
  index({ /* suggestions */ }),
  federatedRefinement({ /* categories */ }),
]);
Display the search bar
With the skeleton in place, create the searchBox widget and link it to the container with the search-box ID.
1
2
3
4
5
6
7
8
9
10
11
12
search.addWidgets([
  searchBox({
    container: '#search-box',
    placeholder: 'Search for products',
    showReset: true,
    showSubmit: true,
    showLoadingIndicator: true,
  }),
  index({ /* products */ }),
  index({ /* suggestions */ }),
  federatedRefinement({ /* categories */ }),
]);
Display and format the main results
After that, configure the first index widget. This is the widget that contains the products. It targets the main index, instant_search. You have to add the hits widget to this index widget, so that it knows how to display the results. You tell it how to render results by providing the templates property on the hits widget.
1
2
3
4
5
6
7
8
9
10
11
12
13
14
15
16
17
18
19
20
21
22
23
24
25
26
27
28
29
30
search.addWidgets([
searchBox({ /* search box */ }),
index({
indexName: 'instant_search',
indexId: 'products',
}).addWidgets([
configure({
hitsPerPage: 3,
}),
hits({
container: '#products',
templates: {
empty: 'No results',
item: `
<div class="item">
<figure class="hit-image-container"><div class="hit-image-container-box"><img class="hit-image" src="{{image}}" alt=""></div></figure>
<p class="hit-category">​</p>
<div class="item-content">
<p class="brand hit-tag">{{{_highlightResult.brand.value}}}</p>
<p class="name">{{{_highlightResult.name.value}}}</p>
<div class="hit-description">{{{price}}}<b class="hit-currency">€</b></div>
</div>
</div>
<br>`,
},
}),
]),
index({/* suggestions */}),
federatedRefinement({/* categories */})
]);
Display and format query suggestions
For the query suggestions, you don’t want to use the default hits format. To override the default format, you have to create a custom render function, renderQSHits. To create a widget from this function, you use the connectHits function, and pass it the renderQSHits function.
1
2
3
4
5
6
7
8
9
10
11
12
13
14
15
16
// Customize UI of the Query Suggestion Hits
const renderQSHits = ({ widgetParams, hits }, isFirstRender) => {
 const container = document.querySelector(widgetParams.container);

 container.innerHTML = `<ul>
   ${hits
     .map(
       (item) => `
       <li>${instantsearch.highlight({ hit: item, attribute: 'query' })}</li>
     `
     )
     .join('')}
 </ul>`;
};

const QSHits = connectHits(renderQSHits);
Add and configure the query suggestions index widget, which targets the query_suggestions index containing your query suggestions. This widget uses the custom QSHits widget to display the hits.
1
2
3
4
5
6
7
8
9
10
11
12
13
14
15
search.addWidgets([
  searchBox({ /* search box */ }),
  index({ /* products */ }),
  index({
    indexName: 'query_suggestions',
  }).addWidgets([
    configure({
      hitsPerPage: 16,
    }),
    QSHits({
      container: '#suggestions',
    }),
  ]),
  federatedRefinement({ /* categories */ }),
]);
Display and format the facets
After that, create a renderFederatedRefinement function to customize how you render the refinements. To create a refinement widget from this function, you pass it to the connectRefinementList function.
1
2
3
4
5
6
7
8
9
10
11
12
13
14
15
16
// Customize UI of the facet column
const renderFederatedRefinement = ({ widgetParams, items }, isFirstRender) => {
 const container = document.querySelector(widgetParams.container);

 container.innerHTML = `<ul>
   ${items
     .map(
       (item) => `
       <li>${item.label}</li>
     `
     )
     .join('')}
 </ul>`;
};

const federatedRefinement = connectRefinementList(renderFederatedRefinement);
Finally, you have to add and configure your custom federatedRefinement widget for the container with the categories ID to display your main index’s facets.
1
2
3
4
5
6
7
8
9
10
11
// Add the widgets
search.addWidgets([
  searchBox({ /* search box */ }),
  index({ /* products */ }),
  index({ /* suggestions */ }),
  federatedRefinement({
    attribute: 'categories',
    container: '#categories',
    limit: 15,
  }),
]);
Next steps
This solution provides the framework for any federated search. The next step is to take this solution and build a full search, browse, and discovery experience that fully fits your needs. There are many ways to do this, but it all comes down to combining different, but related, content on the same screen, and formatting each set of results in the way that highlights their relevance.
Ultimately, a full federated interface is a launching pad to discover the variety of your online catalog, and it should encourage your users to go further and deeper into your online platform.