Merchandising and Rules
On this page
This tutorial advances the solution you created in Unified InstantSearch’s three-part tutorial. It assumes you’ve finished the initial tutorials and produced a workable, production-level version of Unified InstantSearch. The goal here is to improve your solution with merchandising.
The previous tutorials focused on the developer experience. Unified InstantSearch makes it easier and quicker for developers to deliver a first-rate search UI/UX, and to ensure that they use best practices while doing so.
Unified InstantSearch isn’t only for developers. It contains merchandising functionality that enables your company to meet its objectives and revenue targets. Concretely, Algolia embedded its Rules feature into Unified InstantSearch to enable business users to run promotional campaigns, product launches, and marketing strategies directly from the search experience. This guide shows you how to merchandise using your Unified InstantSearch solution.
This tutorial has two objectives:
- Enable marketers, product owners, merchandisers, and website operators to promote products directly to users.
- Show how to create banners and seasonal strategies, and to detect user intent.
Creating Rules
Behind every promotional campaign in your search there are one or more Rules. Rules are search strategies that override the standard execution of an Algolia search. They’re triggered by a small set of clearly defined queries, designed by you. Most Rules follow an “if-this-then-that” pattern. For example: if a search query is “apple”, then display an “iPhone” record as the first result.
Merchandising using the dashboard
Using the Algolia dashboard, there are two ways to create Rules:
- Manual Editor - available for all current plans and some legacy plans (before July 1, 2020)
- Visual Editor - available for Premium plans only
This tutorial uses the dashboard’s Manual Editor. Thus, no coding is required: Unified InstantSearch already contains the necessary code to perform merchandising tasks. That said, there is a small technical aspect to creating Rules: you have to copy and paste the JSON text contained in this tutorial.
Triggers and strategies
Algolia uses the words “trigger” and “strategy” to describe each promotional campaign. For example, if your strategy is to promote Apple products, the trigger is the individual queries that promote Apple products. A classic example is when a user types in “apple” and your strategy is to show Apple’s iPhones first.
The dashboard’s Manual Editor uses the words “condition” for “trigger” and “consequence” for “strategy”. In the preceding example, the condition query=”apple” results in the consequence of showing Apple’s iPhones first.
Adding banners
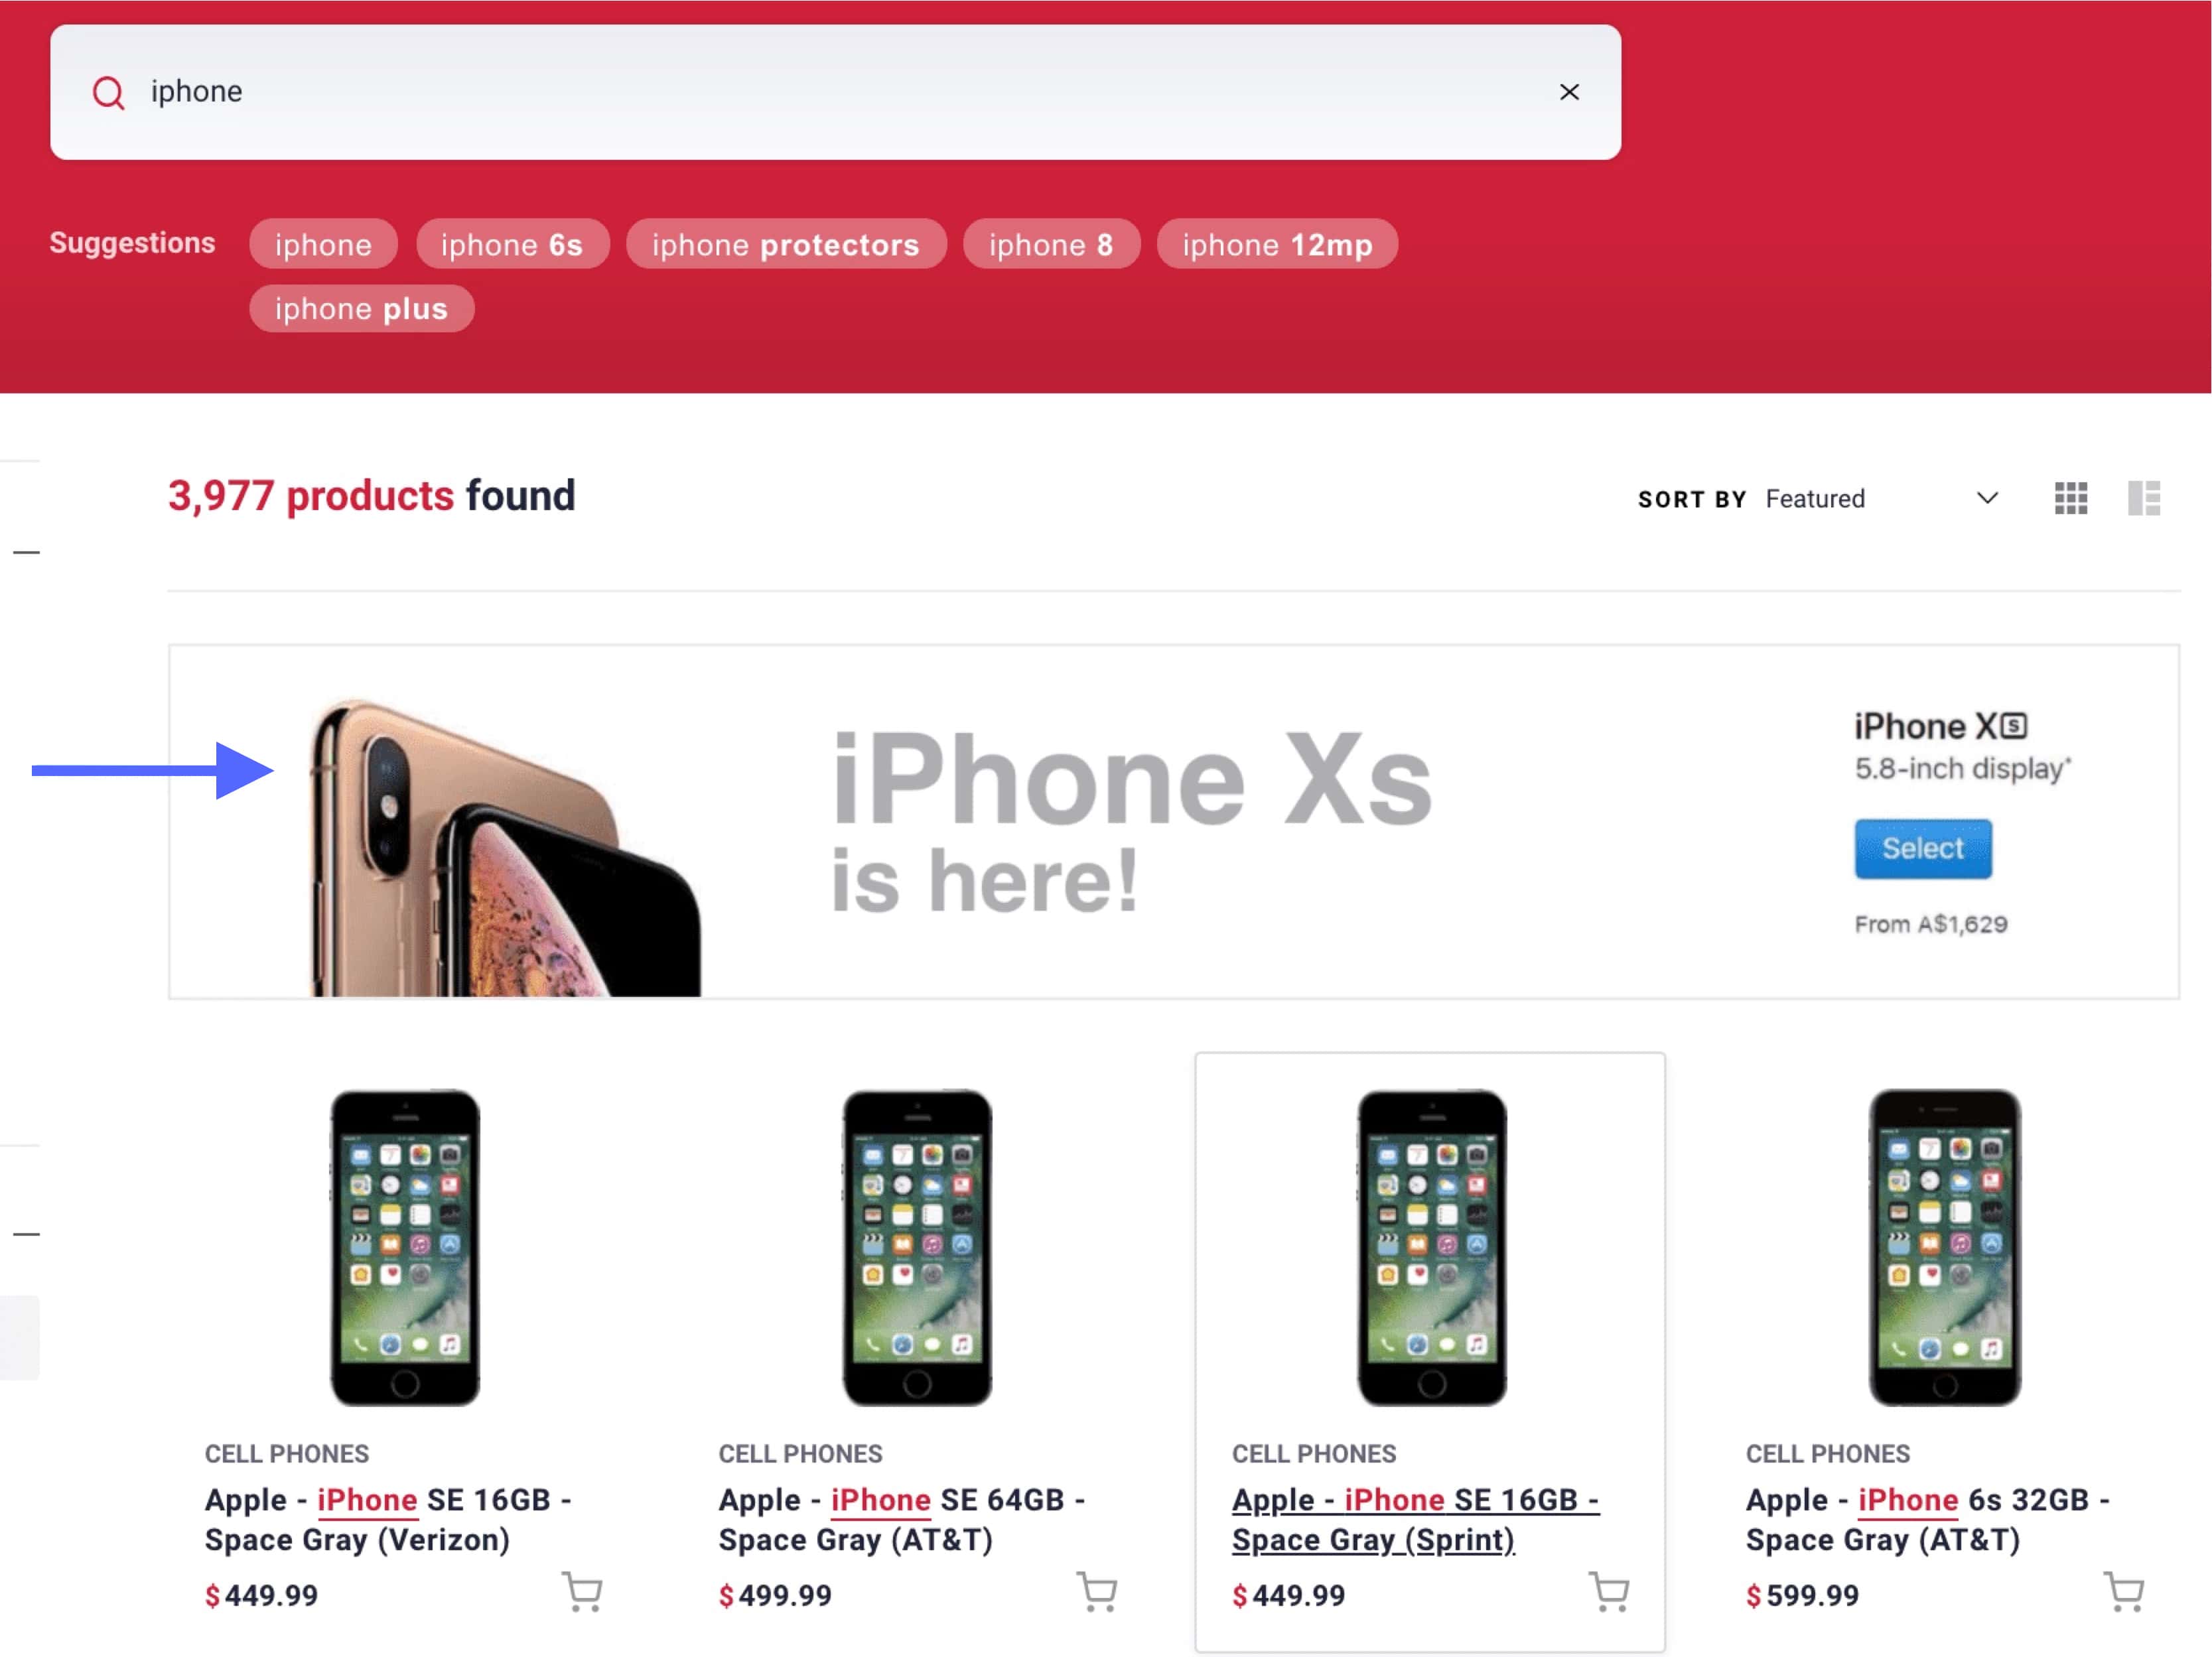
Here’s what a banner looks like for the newest iPhone:
To create this Rule, follow these steps:
- Select the Rules section from the left sidebar menu in the Algolia dashboard.
- Under the heading Rules, select the index you are adding a Rule to.
- Select Create your first rule or New rule. In the dropdown, click on the Manual Editor option.
- In the Condition(s) section, click on Query contains and type “iphone”.
- In the Consequence(s) section, set the following consequence:
- Click the Add consequence button and select Return Custom Data.
- In the input field that appears, copy and paste the JSON text below:
1
2
3
4
5
{
  "title": "iPhone Xs",
  "banner": "https://user-images.githubusercontent.com/6137112/80473185-10281600-8946-11ea-9dbf-652dfbb7968b.jpg",
  "link": "https://www.apple.com/iphone/"
}
Each attribute in the JSON provides information about the banner to display. The title is the name of the banner. This is for formatting purposes only and isn’t displayed in the UI. The banner is the URL of the image to use, and the link is the URL to redirect the user to if they click on the banner.
Don’t forget to save your changes. If you want to forward the Rule to replicas or other indices, toggle Copy this rule to other indices, and enter the relevant indices.
Promoting items as-you-type
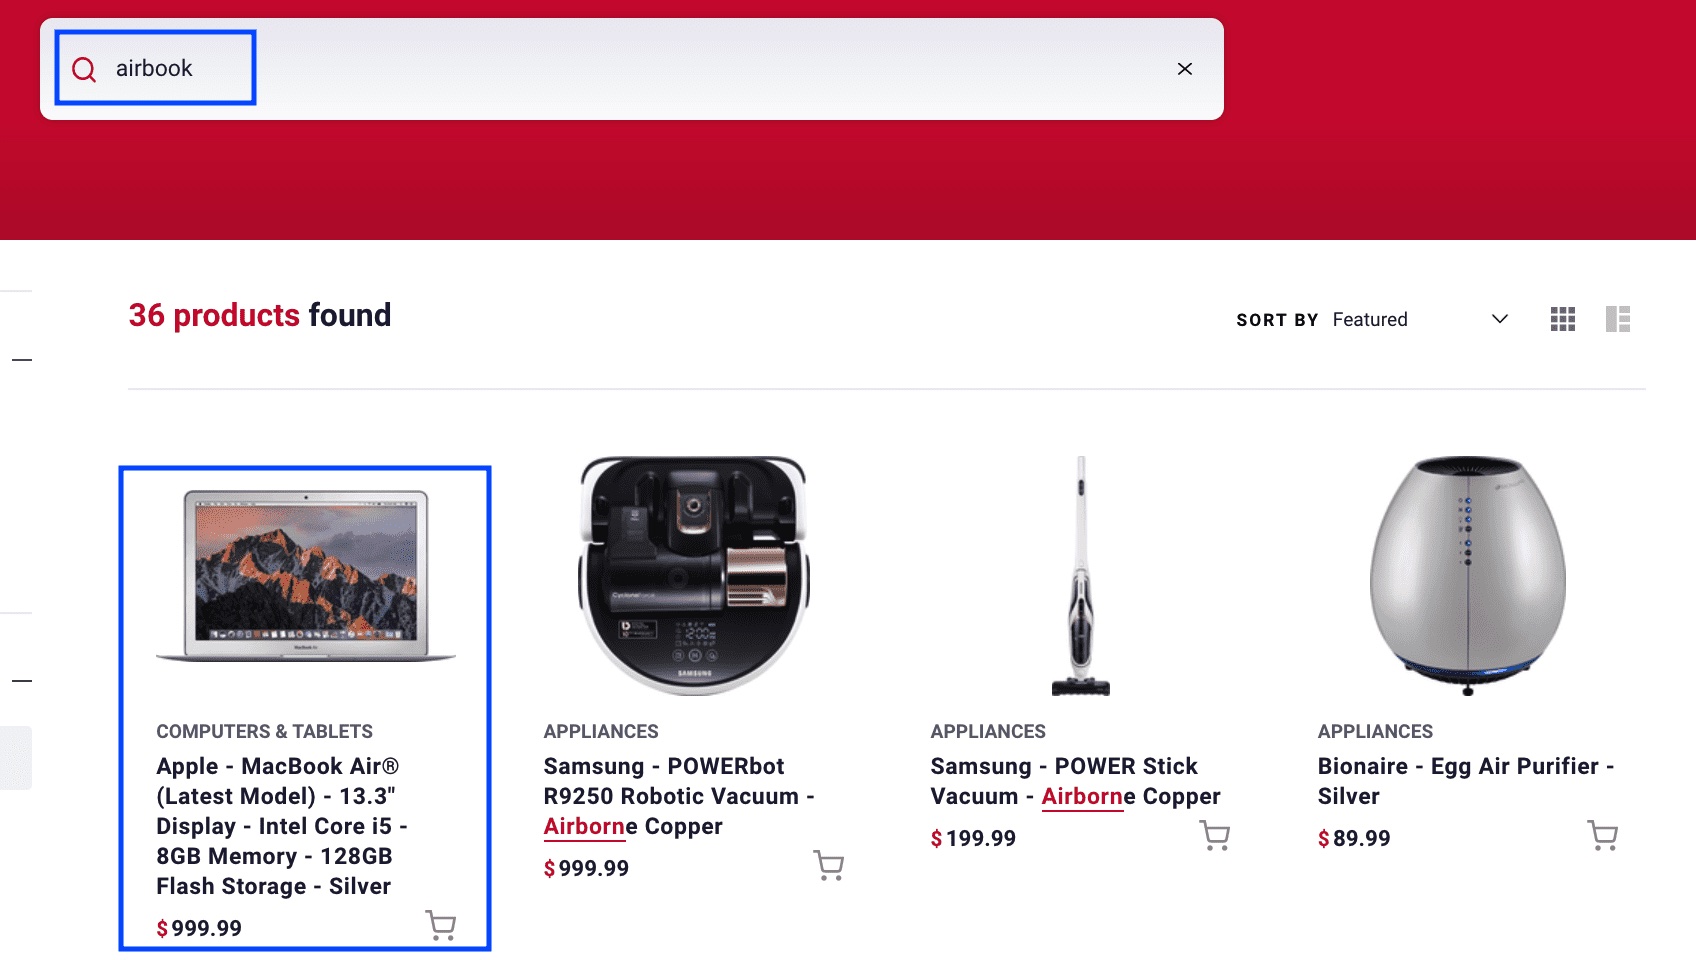
You can also use Rules to promote certain items for certain queries. The example below promotes the latest MacBook Air when a user searches for “airbook”. This query might show irrelevant results because “airbook” is a mix of two words that Algolia searches separately.
To create this Rule, follow these steps:
- Select the Rules section from the left sidebar menu in the Algolia dashboard.
- Under the heading Rules, select the index you are adding a Rule to.
- Select Create your first rule or New rule. In the dropdown, click on the Manual Editor option.
- In the Conditions section, click on Query contains and type “airbook”.
- In the Consequences section, set the following consequence:
- Choose Pin an item (“Pin” is another word for “promote”).
- Search for “MacBook Air” and select the latest model.
Don’t forget to save your changes. If you want to forward the Rule to replicas or other indices, toggle Copy this rule to other indices, and enter the relevant indices.
Promoting items when filtering
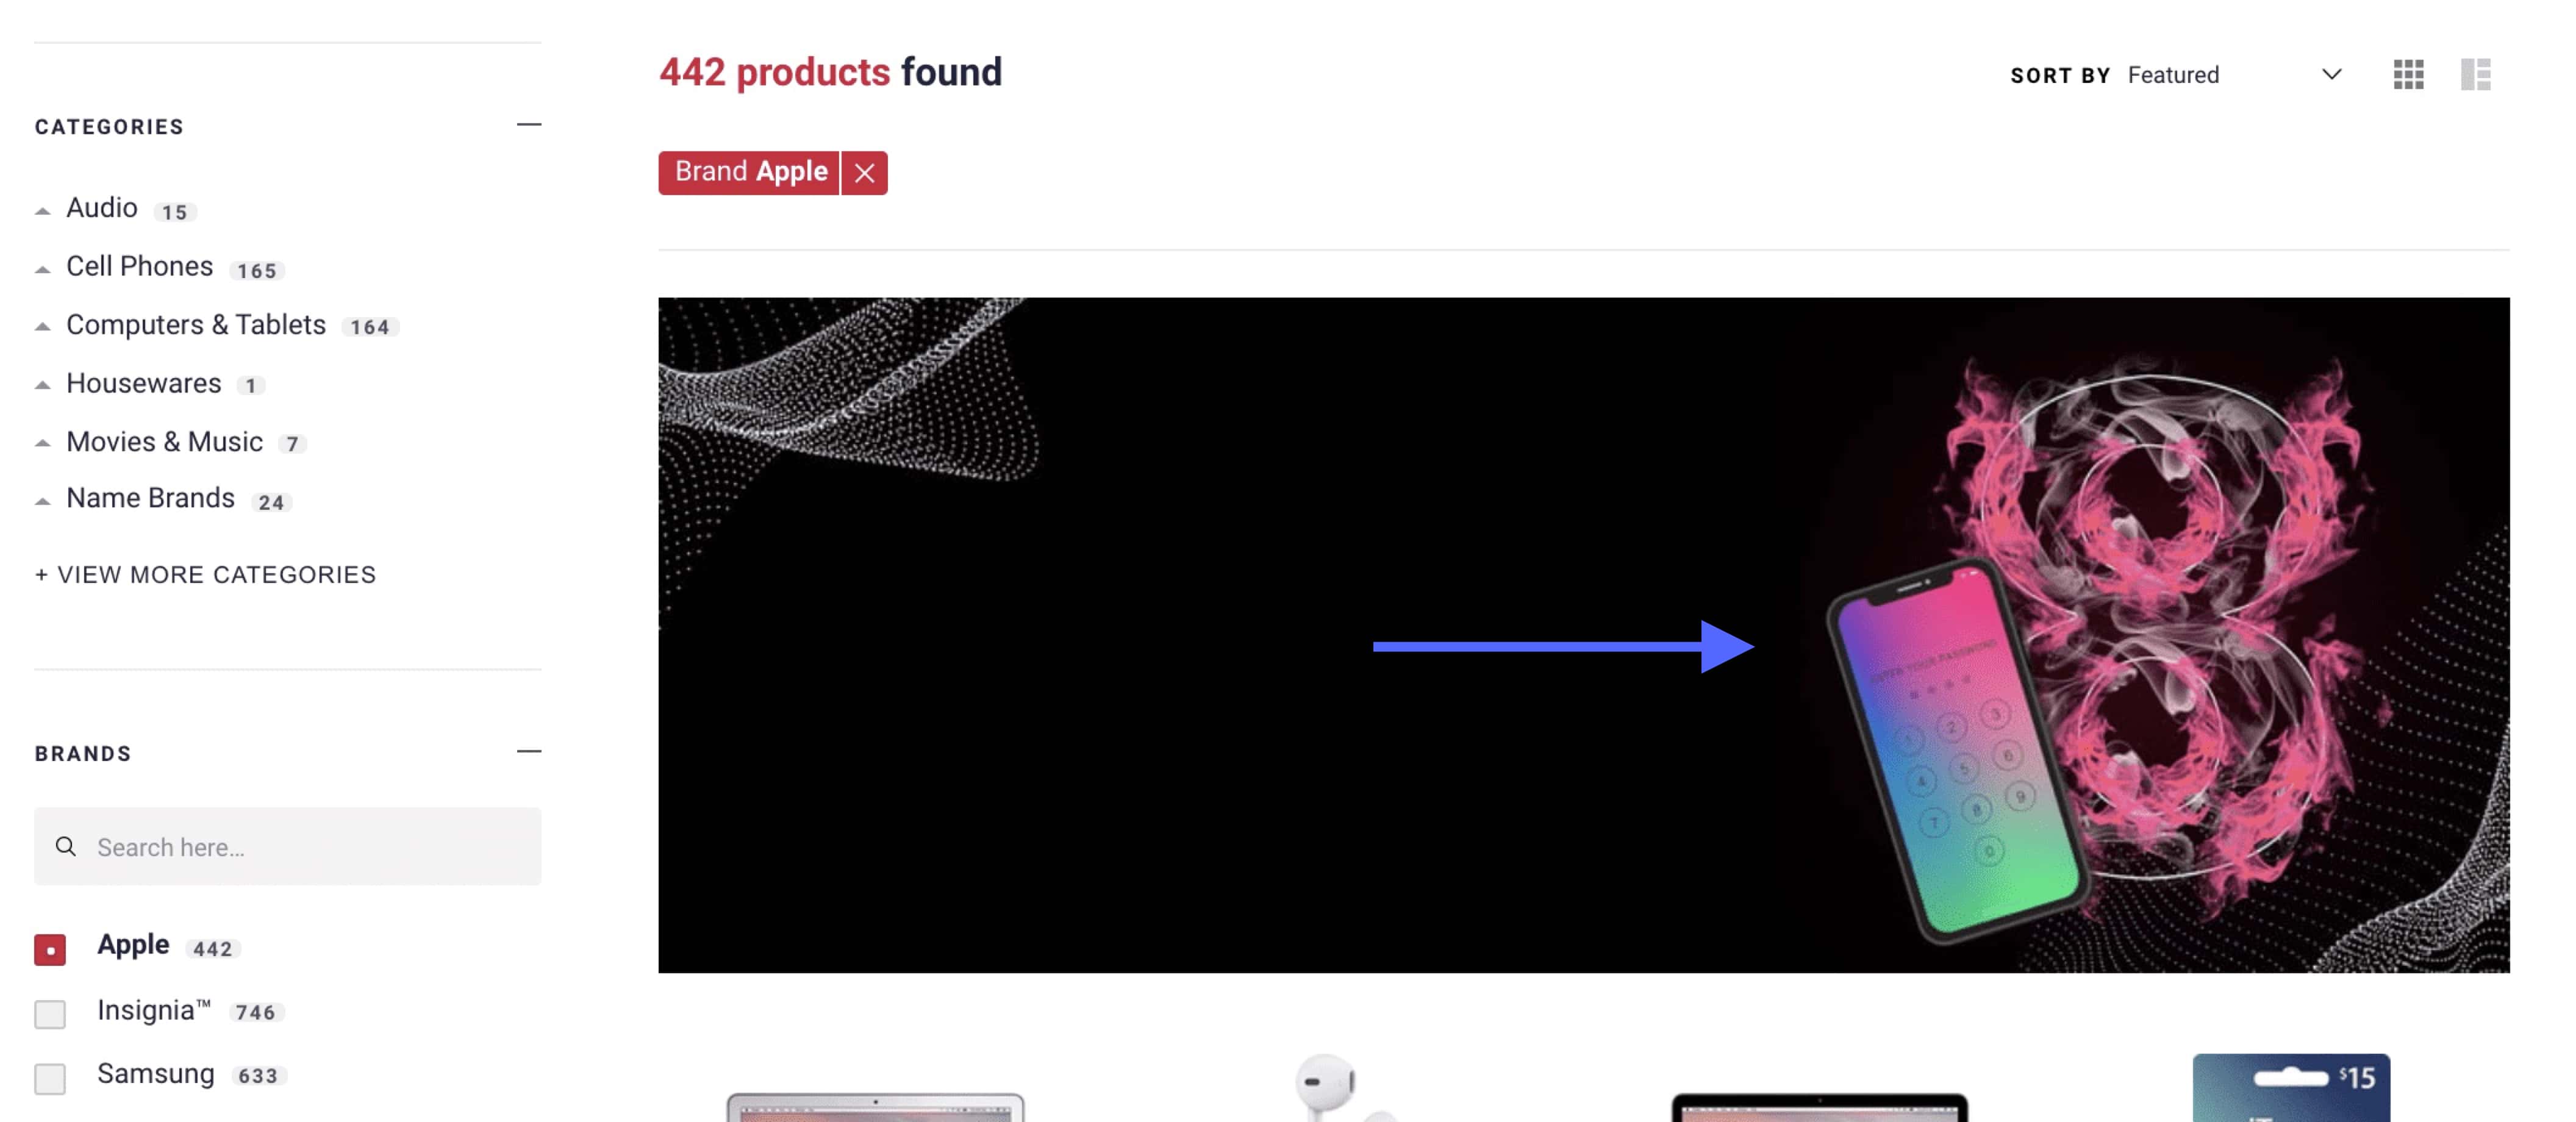
You can display a banner when a user selects a certain filter. For example, here’s a banner showing the newest iPhone, when a user clicks on the “Apple” brand.
To create this Rule, follow these steps:
- Select the Rules section from the left sidebar menu in the Algolia dashboard.
- Under the heading Rules, select the index you are adding a Rule to.
- Select Create your first rule or New rule. In the dropdown, click on the Manual Editor option.
- In the Condition(s) section, click on Query contains and type “ais-brand-Apple”. (This assumes you have a brand
facetand sell Apple products. If not, you need to change the text. The pattern is “ais” + facet name + facet value.) - In the Consequence(s) section, set the following consequence:
- Click the Add consequence button and select Return Custom Data.
- In the input field that appears, copy and paste the JSON text below:
1
2
3
4
5
{
  "title": "Apple",
  "banner": "https://png.jpgtree.com/thumb_back/fw800/back_our/20190620/ourmid/pngtree-new-atmospheric-black-banner-on-iphone8-image_170756.jpg",
  "link": "https://apple.com/"
}
Each attribute in the JSON provides information about the banner to display. The title is the name of the banner. This is for formatting purposes only and isn’t displayed in the UI. The banner is the URL of the image to use, and the link is the URL to redirect the user to if they click on the banner.
Don’t forget to save your changes. If you want to forward the Rule to replicas or other indices, toggle Copy this rule to other indices, and enter the relevant indices.
