Customizing Your UI
On this page
This is the third part of a three-part tutorial on Algolia’s Unified InstantSearch product. The Getting Started and Using Your Own Data tutorials lay down the foundations and codebase for this tutorial.
By this point, you should have a workable search solution with the basic features of any search experience, using your own data. This tutorial builds upon that solution. It’s for users who are ready to complete their solution by adding, modifying, and removing widgets. This tutorial also shows you how to customize the UI so that the look and feel blends in with the branding of your website.
This tutorial has two objectives:
- Create a production-level UI/UX.
- Develop the expertise and autonomy to evolve your search solution.
What the Unified InstantSearch search experience looks like
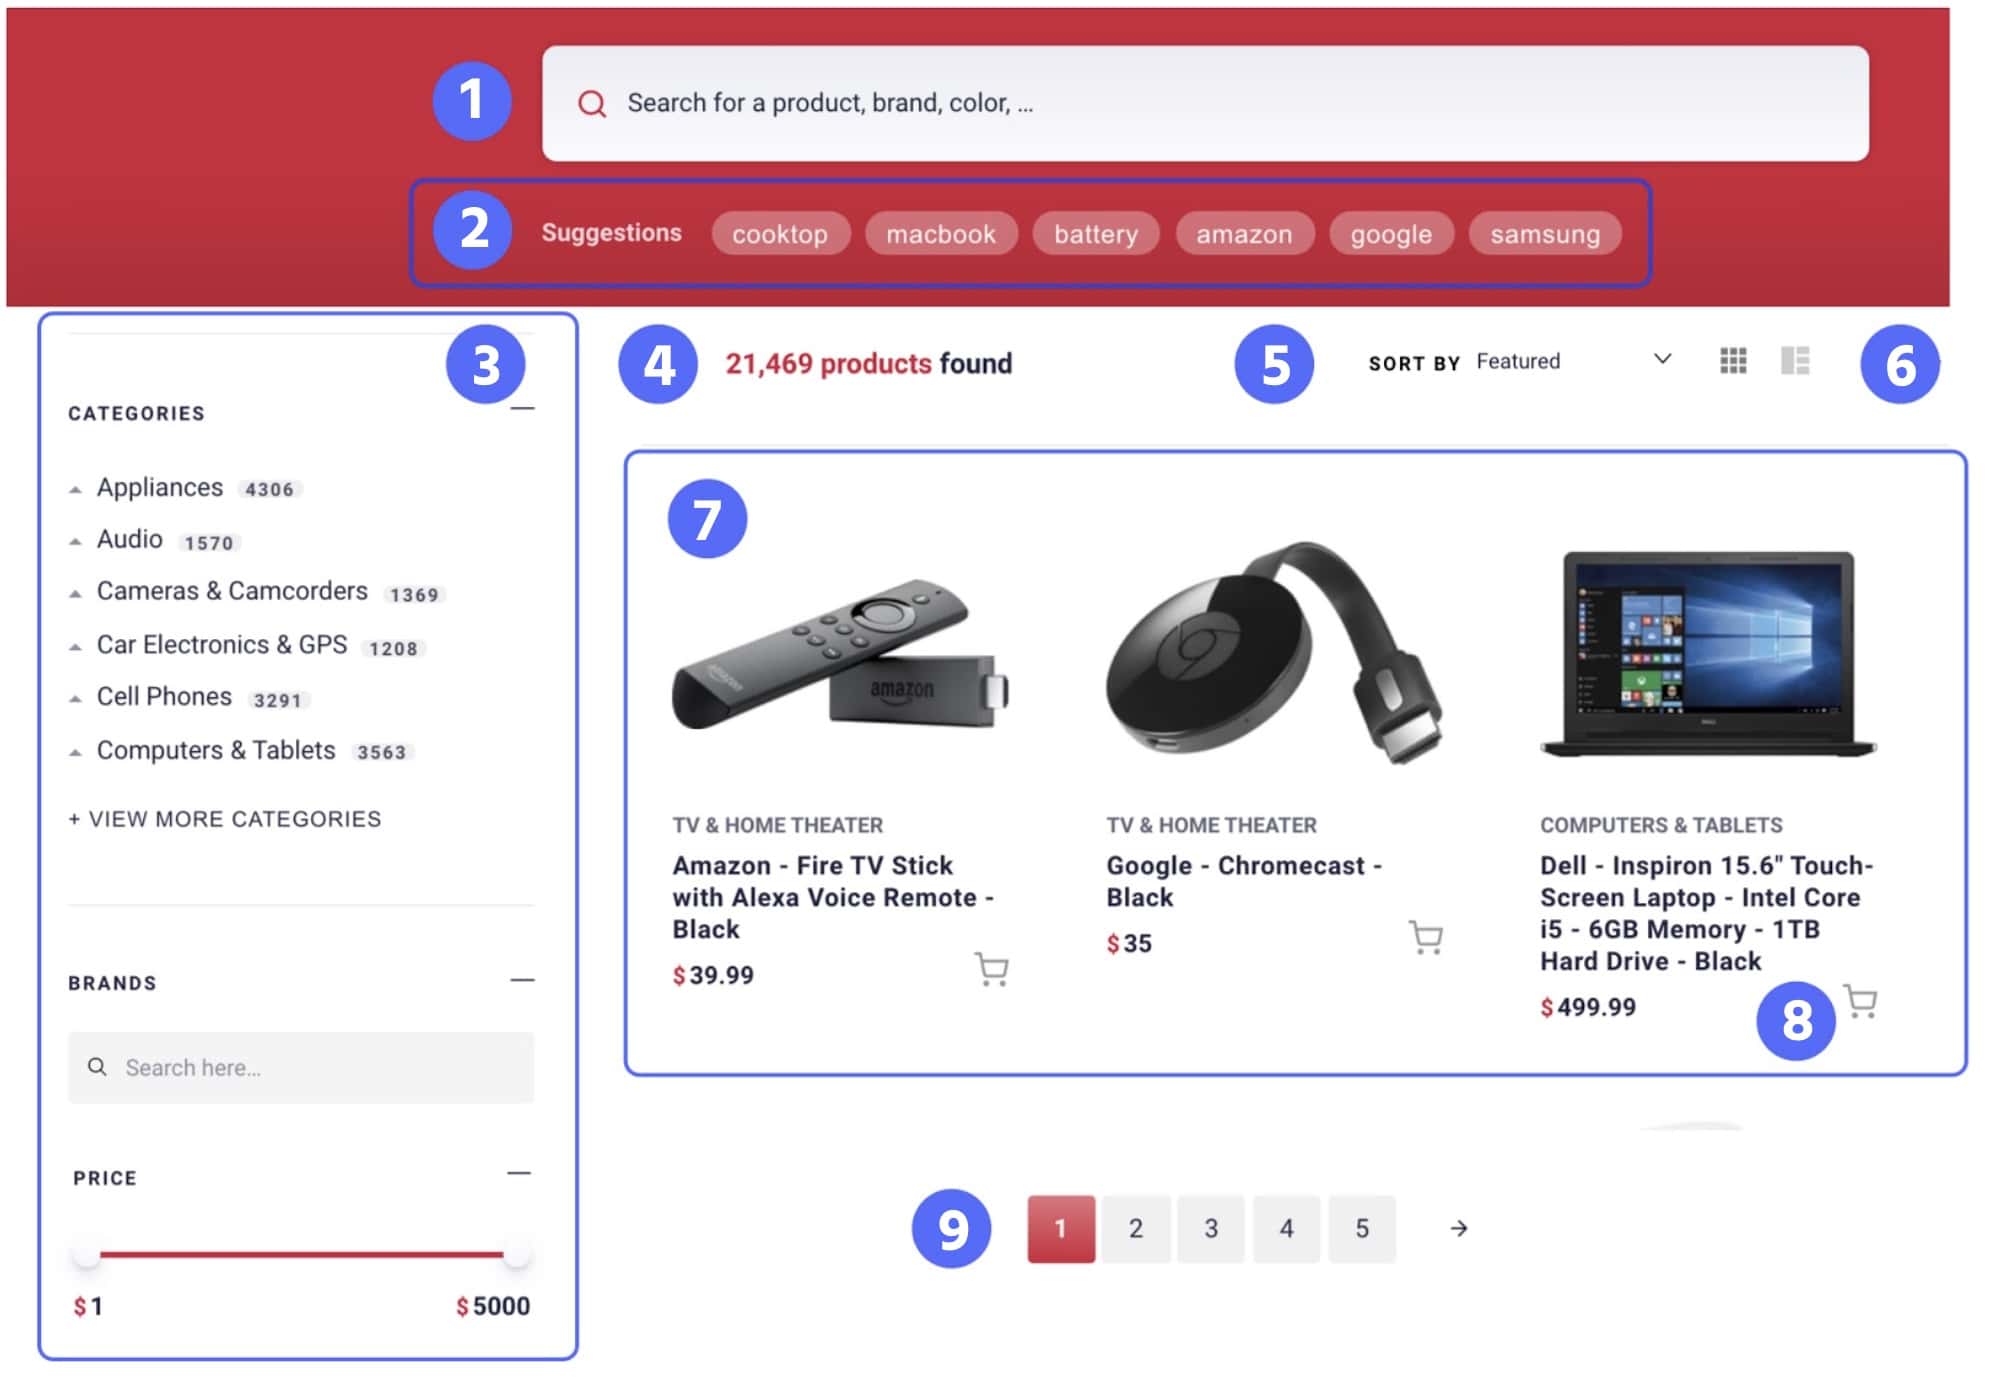
Here is a reminder of the Unified InstantSearch search interface that you installed in the Unified InstantSearch - Getting Started tutorial.

This interface contains basic and recommended functionality.
Basic functionality
These widgets are part of every search solution.
- (1) A search bar
- (4) Number of records found
- (6) List view
- (7) Results display
- (9) Pagination
There’s also some basic functionality not seen in the image:
Recommended functionality
The following widgets are at the core of best search practices. Adding them to the UI requires one or several lines of code:
- (2) Query Suggestions
- (3) Refinements
- (5) Sorting
- (8) Add to Cart button
Here are some recommended functionalities not seen in the image:
This tutorial focuses on adding recommended functionality to your search interface. The previous tutorial discussed the basic functionality.
How to customize Unified InstantSearch
All widgets are found in src/config/settings.js. To activate them, you need only remove the comments. To deactivate a widget, you add back the comments.
For example, here’s how to activate and deactivate sorting.
With comments, sorting is deactivated.
1
2
3
4
5
6
export const sorts = [
//  {
//    label: 'Price ascending',
//    value: 'instant_search_price_asc',
//  }
];
Removing comments activates “Price ascending” as a sort.
1
2
3
4
5
6
export const sorts = [
  {
    label: 'Price ascending',
    value: 'instant_search_price_asc',
  }
];
Thus, to change a widget:
- Uncomment the widget.
- Verify that the parameters of the widget suit your needs.
- [Optional] Extend the widget’s functionality.
All Unified InstantSearch components come activated by default.
Index schema
In this tutorial, the index name is unified_instantsearch_your_data. The index schema for unified_instantsearch_your_data is as follows:
1
2
3
4
5
6
7
8
9
10
11
12
13
14
15
16
17
18
19
20
21
{
  "objectID": "5005506",
  "name": "Apple - iPhone SE 16GB - Space Gray",
  "brand": "Apple",
  "categories": [
    "Cell Phones",
    "iPhone SE"
  ],
  "hierarchicalCategories": {
    "lvl0": "Cell Phones",
    "lvl1": ["Cell Phones > iPhone", "Cell Phones > Cell Phones with Plans"],
  },
  "description": "iPhone SE features a 4-inch Retina display, an A9 chip with 64-bit desktop-class architecture, the Touch ID fingerprint sensor, a 12MP iSight camera, a FaceTime HD camera with Retina Flash, Live Photos, LTE and fast Wi-Fi, iOS 9, and iCloud.",
  "free_shipping": true,
  "image": "https://cdn-demo.algolia.com/bestbuy-0118/5005506_sb.jpg",
  "popularity": 19581,
  "price": 449.99,
  "price_range": "200 - 500",
  "rating": 4,
  "url": "https://api.bestbuy.com/click/-/5005506/pdp"
}
Build up your UI/UX with widgets
Add refinements
On-screen filtering, called facets or refinements, gives users the ability to filter their results by clicking on a facet value. Typical facets are brands and colors. Facets are an essential search feature. For an example, refer to (3) in the Unified InstantSearch interface image.
The JSON contains three attributesForFaceting: brand, categories, and price. If you’ve changed the names of these attributes, you have to change the code in this section.
You can change your refinements in src/config/settings.js.
1
2
3
4
5
6
7
8
9
10
11
12
13
14
export const refinements = [
  {
    header: 'Categories',
    // parameters
  },
  {
    header: 'Brands',
    // parameters
  },
  {
    header: 'Price',
    // parameters
  },
];
Add the brand facet
Here is the code in src/config/settings.js that defines how to display the brand RefinementList.
1
2
3
4
5
6
7
8
9
10
11
12
13
14
15
16
17
18
19
export const refinements = [
  {
    type: 'list',
    header: 'Brands',
    label: 'Brand',
    options: {
      attribute: 'brand',
      searchable: true,
      showMore: true,
      limit: 6,
      showMoreLimit: 20,
      translations: {
        showMore: (expanded) =>
          expanded ? '- View fewer brands' : '+ View more brands',
      },
    },
  }
];
As you can see, it consists of several modifiable attributes:
attributelinks the on-screen refinement to the facet in your index.headerandtypeare for display purposes.limit,showMore,showMoreLimitmanage the amount of viewable facet values.searchableenablessearchForFacetValues.showMoreintranslationsallows you to customize the “show more” message.
You can change these parameters and add others as defined in the RefinementList widget reference guide.
Add the hierarchicalCategories facet
The on-screen “Categories” refinements uses hierarchical categories. The hierarchy comes from the hierarchicalCategories attribute in the JSON record schema :
1
2
3
4
  "hierarchicalCategories": {
    "lvl0": "Cell Phones",
    "lvl1": ["Cell Phones > iPhone", "Cell Phones > Cell Phones with Plans"],
  }
For the hierarchy, the index uses the attributes hierarchicalCategories.lvl0 and hierarchicalCategories.lvl1. Here’s the final code in src/config/settings.js:
1
2
3
4
5
6
7
8
9
10
11
12
13
  {
    type: 'hierarchical',
    header: 'Categories',
    label: 'Category',
    options: {
      attributes: [
        'hierarchicalCategories.lvl0',
        'hierarchicalCategories.lvl1',
      ],
      limit: 6,
      showMore: true,
    },
  },
Add the price facet
You can represent numerical attributes with sliders, as seen here with price.
JSON represents the price attribute as a number.
1
  "price": 449.99,
This gets displayed as a type: slider in src/config/settings.js.
1
2
3
4
5
6
7
8
9
10
11
12
13
14
  {
    type: 'slider',
    header: 'Price',
    label: 'Price',
    options: {
      attribute: 'price',
      transformValue: (value) => (
        <>
          <span className="uni-Hit-currency">$</span>
          {value}
        </>
      ),
    },
  },
Add sorting
Sorting is another essential search feature. It gives users control over the relevance of their results. For an example, refer to (4) in the Unified InstantSearch interface image.
For every sort, you need to create a new index called a replica. The example offers the user two sorts, so you need to create two new replicas.
Change your sorting in src/config/settings.js.
1
2
3
4
5
6
7
8
9
10
export const sorts = [
  {
    label: 'Price ascending',
    value: 'unified_instantsearch_your_data_price_asc',
  },
  {
    label: 'Price descending',
    value: 'unified_instantsearch_your_data_price_desc',
  },
];
labelis for display purposes.valuelinks the sort widget to the replica index.
Activate “Add to cart” button
You can add, modify, or remove the code used for Add to cart button in src/hits.hs. See (8) in the Unified InstantSearch interface image.
1
2
3
4
5
6
7
8
9
10
11
12
13
14
15
16
<div className="uni-Hit-Actions">
  <button
    title="Add to cart"
    className="uni-Hit-ActionButton"
    onClick={(event) => {
      event.preventDefault();
      event.stopPropagation();

      insights('convertedObjectIDsAfterSearch', {
        eventName: 'Product Added to Cart',
      });
    }}
  >
    <CartIcon />
  </button>
</div>
Add Query Suggestions
Query Suggestions is a search pattern used in almost every online e-commerce site. See (2) in the Unified InstantSearch interface image. Algolia offers you a complete Query Suggestion solution that you manage in the Query Suggestions dashboard.
Once you’ve set up your Query Suggestions index (named unified_instantsearch_your_data_query_suggestions in this example), you need to link the project to this index using the indexName parameter below.
1
2
3
4
5
6
export const suggestionsIndex = {
  indexName: 'unified_instantsearch_your_data_query_suggestions',
  searchParameters: {
    hitsPerPage: 6,
  },
};
Add a no results page
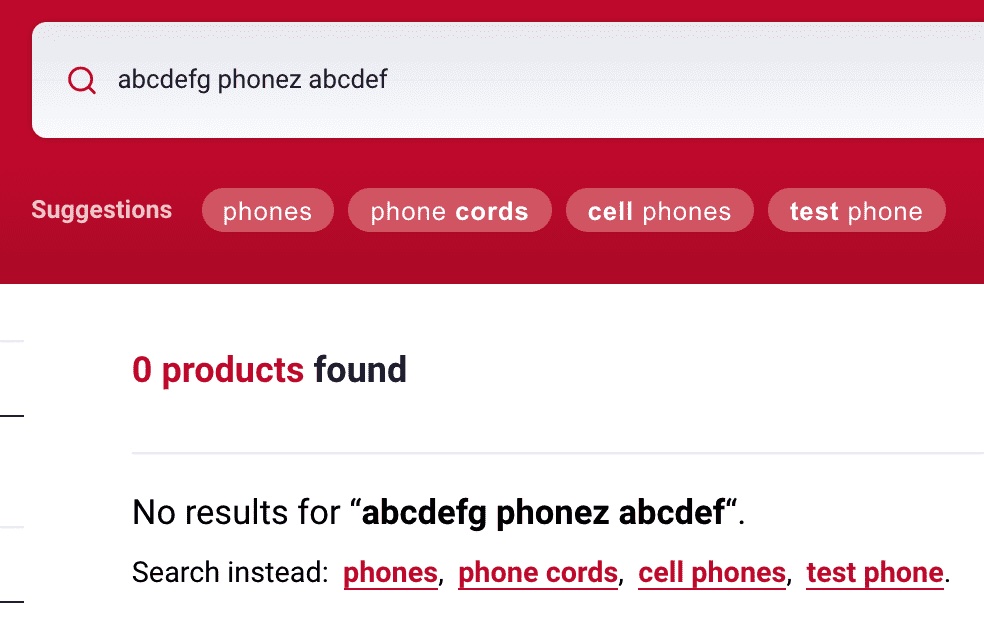
When a user types in a query and gets no results, they should see a helpful message. The page that displays this message is called a “no results” page.
Unified InstantSearch includes a no results page out of the box. It serves two purposes:
- To let users know their search has produced no results.
- To allow you to propose or promote related products and/or searches when it happens.

This page achieves the two stated purposes.
- If there aren’t Query Suggestions, it presents a simple no results message.
- If there are Query Suggestions, it presents the suggestions along with the “no results” message.
You can modify your no results page in src/components/NoResultsHandler.js.
Add Personalization
If using Personalization, you need to pass a userToken so that Algolia can personalize the results based on a user’s affinity profile. You do that here, in src/config/settings.js:
1
2
3
export const setUserToken = (setToken) => {
  setToken(/* The current user's `userToken` */);
};
You need to replace the comments with the current user’s userToken. Check out the guide on how to create a unique user token for best practices.
Once you set the userToken, you don’t need to do anything else: Unified InstantSearch automatically enables Personalization in src/App.js, using a boolean logic based on whether userToken has been set or not. Here is the code, but you don’t need to change this:
1
2
3
4
5
const searchParameters = {
  userToken,
  enablePersonalization: Boolean(userToken),
  // other parameters
};
You need to have a working Personalization implementation to use this feature. Personalization is available for Premium plans only.
Next steps
At this point, you’re ready to go live. You can improve your solution with the following advanced functionalities.
Track usage and fine-tune your relevance
At this point, you have all the features of a great search experience. The next step is to analyze your usage using the Analytics you’ve put in place. You can also add new click and conversion events. With Click and Conversion Analytics in place, you can perform A/B testing to fine-tune your relevance.
Add merchandising
You can also add merchandising and content management techniques like promoting items and brands, adding banners, and more. Unified InstantSearch offers merchandising out of the box. See the merchandising tutorial for details.
Improve your search UI/UX
You have access to the full codebase and CSS that builds your interface. You are welcome to use the Unified InstantSearch foundation to design an even more vivid and innovative search UX.
