Using Your Own Data
On this page
This is the second part of a three-part tutorial on Algolia’s Unified InstantSearch product. Start with Getting started with Unified InstantSearch if you haven’t already done so.
This tutorial describes how to integrate your data into Unified InstantSearch with the same codebase as the first tutorial. This tutorial also shows you how to format your data for Unified InstantSearch and push it to Algolia. The result is a working solution with the basic UI/UX components of most search experiences.
This tutorial has two objectives:
- Integrate your data in Unified InstantSearch.
- Make small adjustments to blend in with your website.
Set up your index
Every Algolia implementation involves four principle tasks:
- Uploading data to Algolia
- Configuring relevance settings
- Building search UI/UX
- Getting insights and analytics
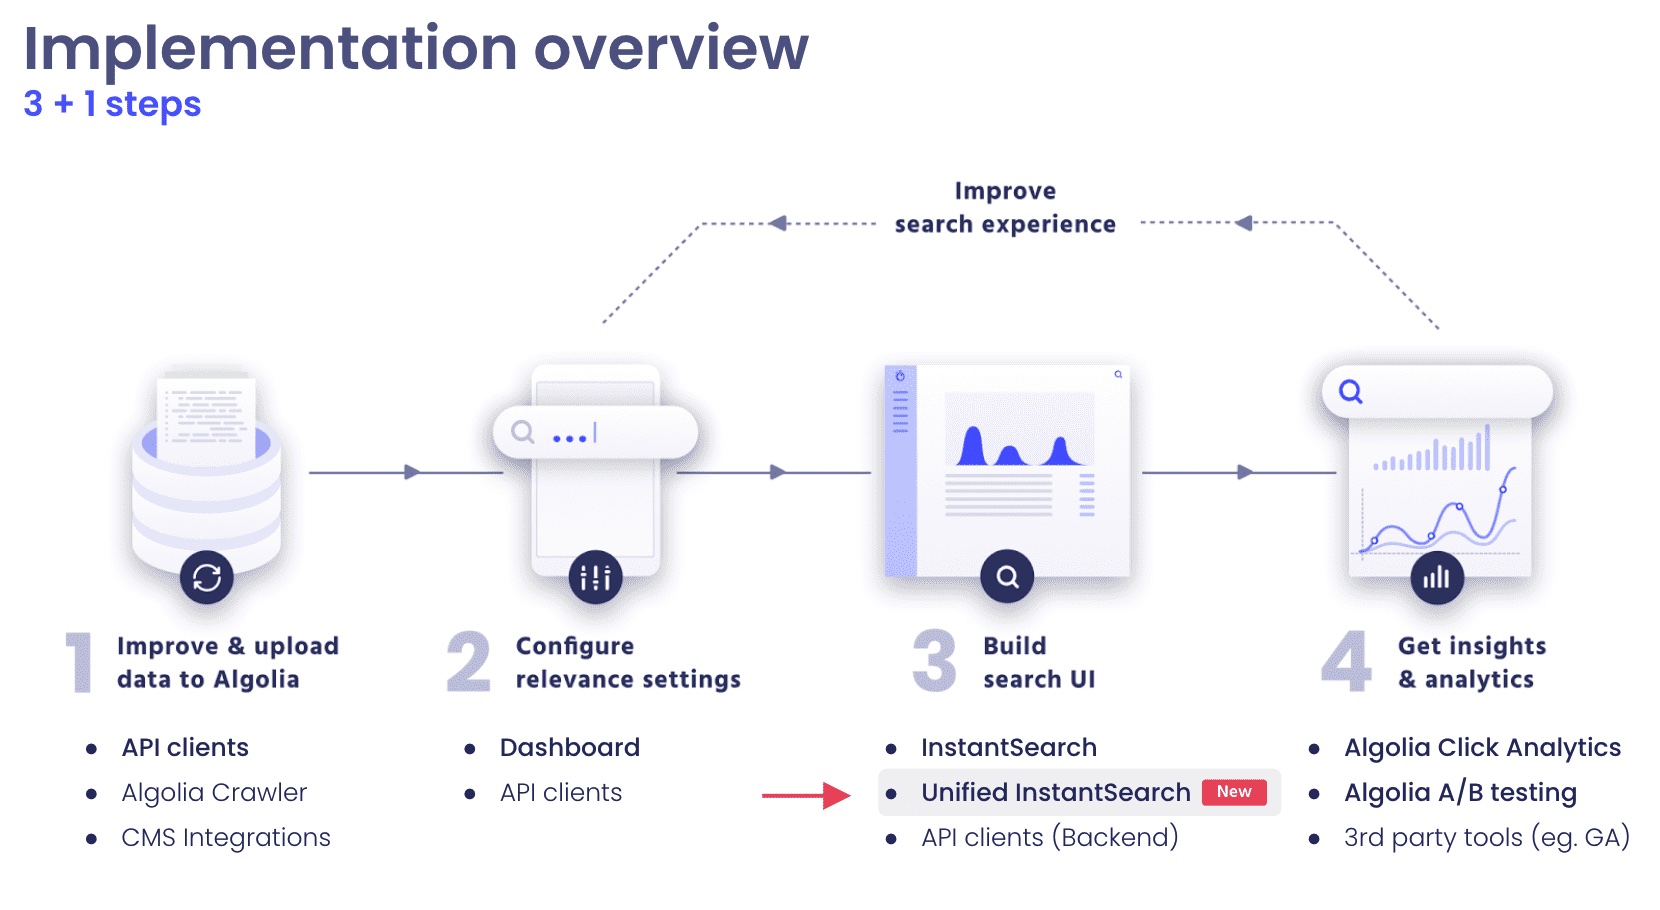
Unified InstantSearch is part of the building search UI step. But before getting to the UI, you need to create your index, which involves formatting and sending your data to Algolia. That’s the focus of this section. You can create an index with the API or Dashboard.
Collect and select data
The first step is to collect data from your data sources. The goal here is to extract information necessary for search, not to create a dump of all your data. To do this, it’s helpful to learn more about the four kinds of data needed for search.
Format your data
Next, you need to format your data. Here’s an example of the kind of data used by most retail users. This tutorial uses the attributes name, description, price, image, brand, and popularity.
1
2
3
4
5
6
7
8
9
10
11
12
13
14
15
16
17
18
19
20
21
{
  "objectID": "5005506",
  "name": "Apple - iPhone SE 16GB - Space Gray",
  "brand": "Apple",
  "categories": [
    "Cell Phones",
    "iPhone SE"
  ],
  "hierarchicalCategories": {
    "lvl0": "Cell Phones",
    "lvl1": ["Cell Phones > iPhone", "Cell Phones > Cell Phones with Plans"],
  },
  "description": "iPhone SE features a 4-inch Retina display, an A9 chip with 64-bit desktop-class architecture, the Touch ID fingerprint sensor, a 12MP iSight camera, a FaceTime HD camera with Retina Flash, Live Photos, LTE and fast Wi-Fi, iOS 9, and iCloud.",
  "free_shipping": true,
  "image": "https://cdn-demo.algolia.com/bestbuy-0118/5005506_sb.jpg",
  "popularity": 19581,
  "price": 449.99,
  "price_range": "200 - 500",
  "rating": 4,
  "url": "https://api.bestbuy.com/click/-/5005506/pdp"
}
For a full explanation of JSON records, check out the JSON record specifications.
Push your data to Algolia
The next step is to send your data to Algolia. You have two options to index the records:
- Dashboard - see the tutorial on how to import data with the dashboard.
- API - see the tutorial on how to import data using the API.
To follow this tutorial, name your index unified_instantsearch_your_data.
Finally, you need to configure the following settings:
- Searchable attributes ensure the search is looking at the right information (not the image URL, for example). For this record set,
name,description, andbrandare appropriatesearchableAttributes. - Custom ranking ensures the best relevance for similar items. For this record set,
popularityis an appropriatecustomRanking.
Unified InstantSearch relies on a specific set of names for its attributes, for example, name and description. You can use different names in your record, but you then need to change their references in the src/config/Hit.js for the Hit component, and /src/config/settings.js for your facets.
Configure your Unified InstantSearch application
For Unified InstantSearch to access your application and index, you need to add the correct credentials to your local Unified InstantSearch project.
Go to your local Unified InstantSearch project and open src/config/settings.js. There are three variables you need to change to have Unified InstantSearch start using your index.
1
2
3
4
5
6
export const appId = '<add you Application ID>';
export const searchApiKey = '<add your API key>';

export const index = {
  indexName: 'unified_instantsearch_your_data',
};
You can find the application ID and API Keys in the API Keys section of the Dashboard and index names in the Indices section. As noted, for purposes of this tutorial, use the name unified_instantsearch_your_data to populate your data.
What the Unified InstantSearch search experience looks like
Here’s a reminder of the Unified InstantSearch search interface that you installed in the Getting started with Unified InstantSearch tutorial.

This interface contains basic and recommended functionality.
Basic functionality
These widgets are part of every search solution.
- (1) A search bar
- (4) Number of records found
- (6) List view
- (7) Results display
- (9) Pagination
There’s also some basic functionality not seen in the image:
Recommended functionality
The following widgets are at the core of best search practices. Adding them to the UI requires one or several lines of code:
- (2) Query Suggestions
- (3) Refinements
- (5) Sorting
- (8) Add to Cart button
Here are some recommended functionalities not seen in the image:
This tutorial focuses on getting the basic functionality working with your own data. The next tutorial describes the recommended best practices.
Change the basic functionality
Make all changes in the following two files:
src/config/hits.js- customize how you display the results.src/config/settings.js- customize different widgets of your search experience.
Improve the results display
You can use the hits widget in src/config/hits.js to customize the results display. For an example, refer to (7) in the Unified InstantSearch interface image.
Algolia designed Unified InstantSearch’s results to match the best examples in the industry. Results always appear in the center of the page, and each item is in an eye-catching box (three per line) in the grid view, or rectangle (a single item per line) in the list view. Each item contains:
- an image
- a title
- a description
- the price
That said, the results display is completely customizable. You can code them to look entirely different and place them anywhere on the screen.
You’ll find the code for the results in src/config/hits.js. You can change this code or replace it entirely. The key is to understand the hits widget. The hits widget has access to each item’s attributes received in the API response. For example, it gives you access to an item’s image, title, description, and more. Keep in mind, you control the contents of the response with how you define your index and using the attributesToRetrieve parameter.
Here’s the code that displays the results, using the attributes in the hit variable.
1
2
3
4
5
6
7
8
9
10
11
12
13
14
15
16
17
18
19
20
21
22
23
24
25
26
27
28
29
30
31
32
33
34
35
36
37
38
39
40
export function Hit({ hit, insights, view }) {
  return (
    <article
      className="uni-Hit"
      onClick={() =>
        insights('clickedObjectIDsAfterSearch', {
          eventName: 'Product Clicked',
        })
      }
    >
      <a href={hit.url} className="uni-Hit-inner">
        <div className="uni-Hit-image">
          <img src={hit.image} alt={hit.name} loading="lazy" />
        </div>

        <div className="uni-Hit-Body">
          <header className="uni-Hit-header">
            <h2 className="uni-Hit-category">{hit.categories[0]}</h2>

            <h1 className="uni-Hit-title">
              <Highlight attribute="name" tagName="mark" hit={hit} />
            </h1>
          </header>

          {view === 'list' && (
            <p className="uni-Hit-description">
              <Snippet attribute="description" tagName="mark" hit={hit} />
            </p>
          )}

          <footer>
            <span className="uni-Hit-currency">$</span>
            <span className="uni-Hit-price">{hit.price.toLocaleString()}</span>
          </footer>
        </div>
      </a>
    </article>
  );
}
An example of a minor modification is to include the subcategory in the category display on each result.
To accomplish that, you can change this:
1
<h2 className="uni-Hit-category">{hit.categories[0]}</h2>
to
1
<h2 className="uni-Hit-category">{hit.categories.join(" > ")}</h2>
Now refresh the screen. You should see the subcategories displayed. These kinds of changes are unlimited.
Change the placeholder
You can change the placeholder on this screen in src/components/SearchBox/ConnectedSearchBox.js. You need to change the placeholder in two places in that file.
1
placeholder: 'Search for a product, brand, color, …',
Implement Click Analytics
There are two parts to implementing Click Analytics.
1. Tell the search engine to enable analytics. You do this in src/config/settings.js.
1
2
3
4
5
6
export const index = {
  searchParameters: {
    analytics: true,
    clickAnalytics: true,
  },
};
2. Add click-analytic events to your results. You do this in src/config/hits.js.
Click Analytics requires that you send events that capture user behaviors. You can do this in the onClick event handler using the insights library.
1
2
3
4
5
6
7
8
9
10
11
12
13
14
export function Hit({ hit, insights, view }) {
  return (
    <article
      className="uni-Hit"
      onClick={() =>
        insights('clickedObjectIDsAfterSearch', {
          eventName: 'Product Clicked',
        })
      }
    >
      // result display logic
    </article>
  );
}
This demo sends the event type clickedObjectIDsAfterSearch for every click on an item in the results.
Finally, if you are using Google Analytics, you can activate it in src/config/settings.js.
1
export const googleAnalytics = false;
Next steps
Now that you have a basic UI/UX with best practices, it’s time to complete the solution. In the next tutorial, you’ll be adding widgets for a production-level search experience.