Getting Started with Flutter Using Platform Channels
This guide explains how to build a multi-platform search experience using the Swift API client and Flutter platform channels. You’ll build a classic search interface with Flutter, backed by the Swift API Client.
Prepare your project
To use Algolia search, you need an Algolia account. You can create a new account, or use the following credentials:
- Application ID:
latency - Search API Key:
1f6fd3a6fb973cb08419fe7d288fa4db - Index name:
bestbuy
These credentials give access to a preloaded dataset of products appropriate for this guide.
Create a new app project
Start by creating a new app.
In a terminal run: flutter create algoliasearch
In the ./algoliasearch/ios/ directory, you’ll find the generated Xcode workspace Runner.xcworkspace. Double click to open it.
Add project dependencies
This tutorial uses Swift Package Manager to integrate the Algolia libraries.
If you prefer to use another dependency manager (Cocoapods, Carthage) please checkout the corresponding installation guides.
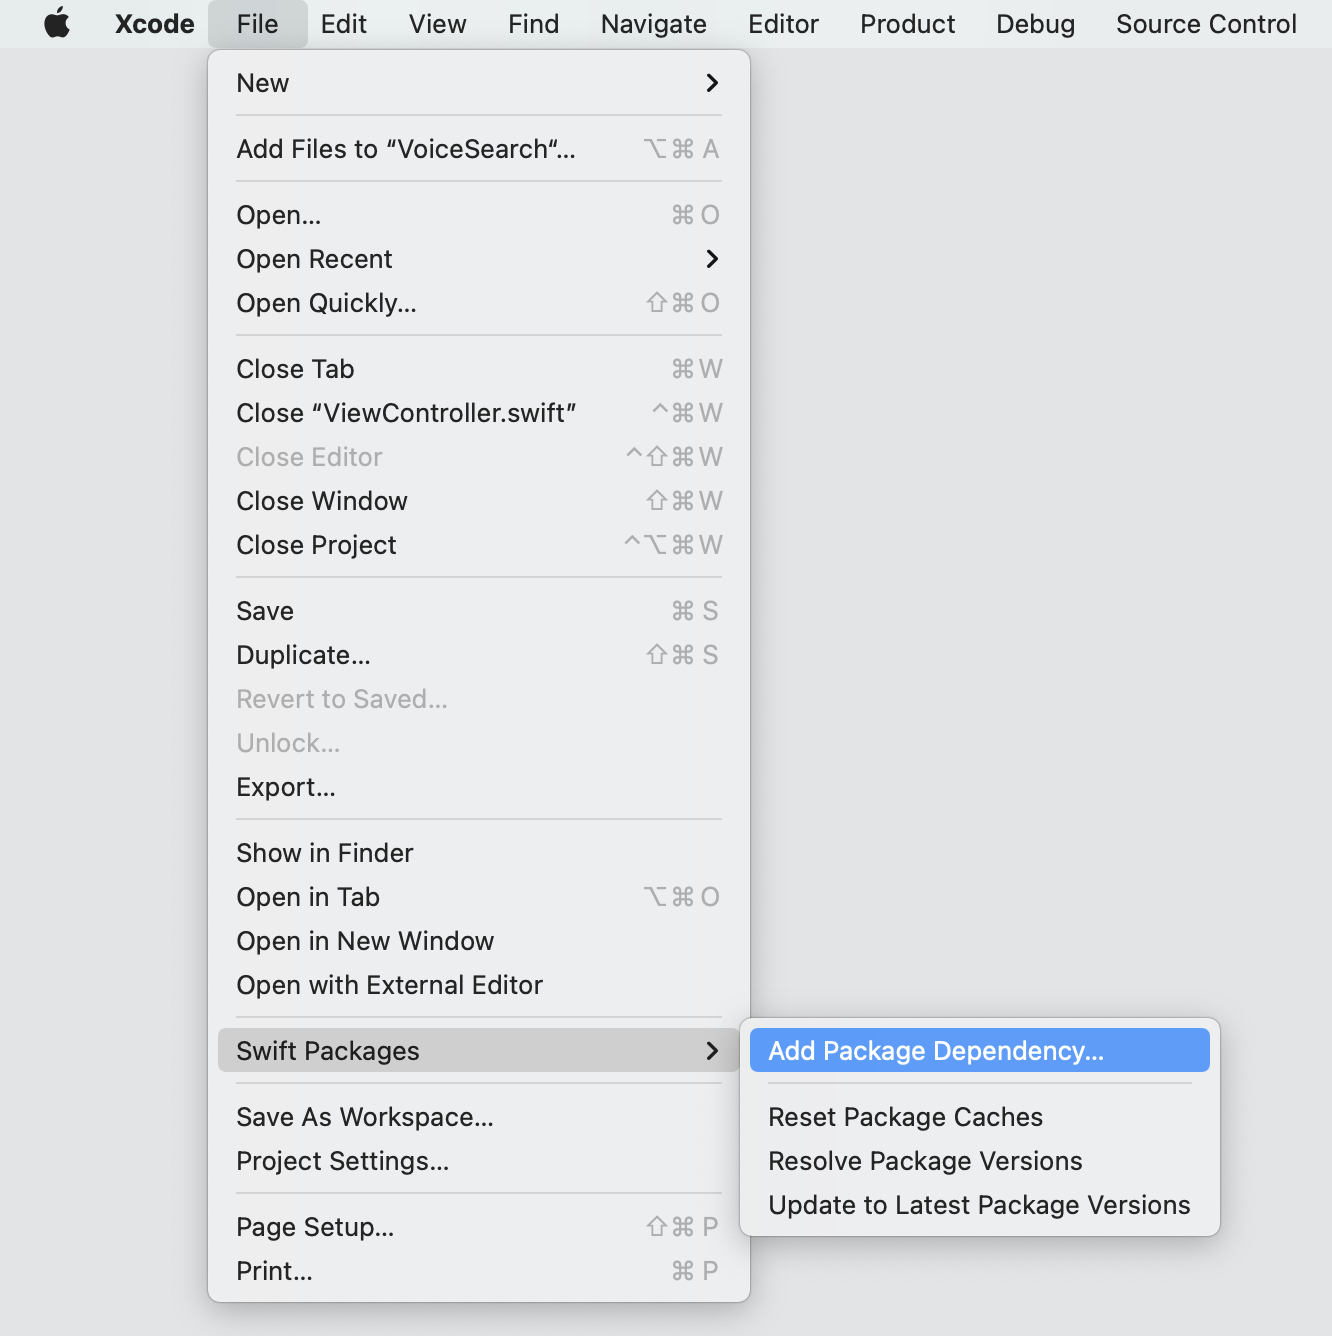
In the menu bar select File -> Swift Packages -> Add Package Dependency.

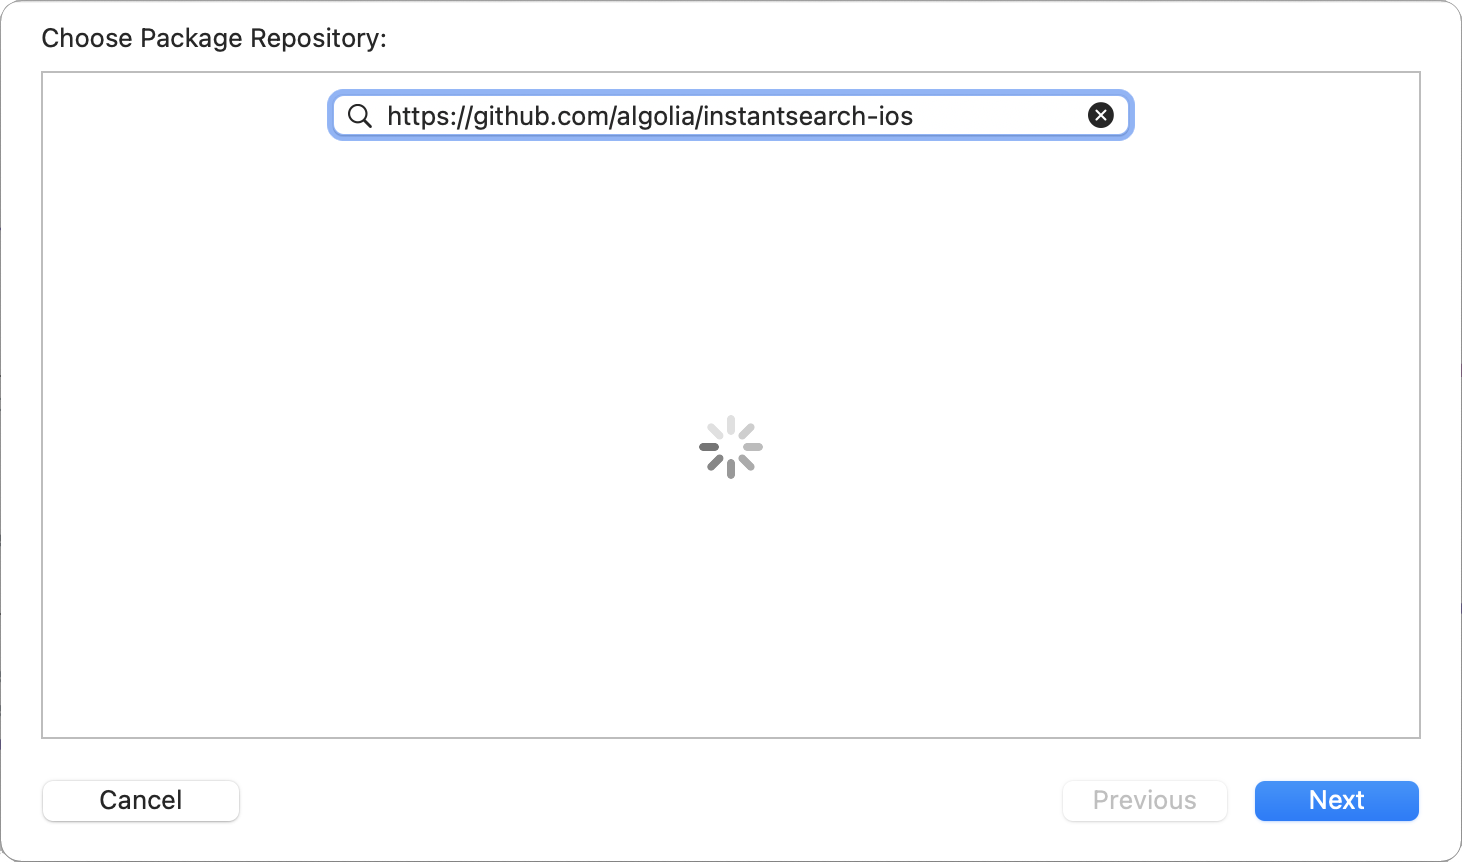
Paste the GitHub link for the Swift API client library: https://github.com/algolia/algoliasearch-client-swift

Pick the latest library version on the next screen, choose the AlgoliaSearchClient product and click Finish.
Your dependencies are installed and you’re all set to work on your application.
Prepare a platform channel
Flutter uses a flexible system that allows you to call platform-specific Swift APIs on iOS. Create your platform channel bridging the Swift API Client and Flutter search UI.
Open the AppDelegate.swift file and import the Swift Client:
1
import AlgoliaSearchClient
Add the AlgoliaAPIFlutterAdapter class with the SearchClient with your application ID and API key:
1
2
3
4
5
6
7
8
9
class AlgoliaAPIFlutterAdapter {

  let searchClient: SearchClient

  init(applicationID: ApplicationID, apiKey: APIKey) {
    self.searchClient = SearchClient(appID: applicationID, apiKey: apiKey)
  }

}
Add a search method. This should perform a search request using the provided index name and query parameters, and return the result in the completion of FlutterResult type.
Since FlutterResult completion doesn’t support custom types, the SearchResponse result must be encoded to a JSON string.
1
2
3
4
5
6
7
8
9
10
11
12
13
14
15
16
17
18
19
20
21
22
23
24
class AlgoliaAPIFlutterAdapter {

  let searchClient: SearchClient

  init(applicationID: ApplicationID, apiKey: APIKey) {
    self.searchClient = SearchClient(appID: applicationID, apiKey: apiKey)
  }

  func search(indexName: IndexName, query: String, completion: @escaping FlutterResult) {
    searchClient
    .index(withName: indexName)
    .search(query: "\(query)") { result in
      switch result {
      case .success(let response):
        let data = try! JSONEncoder().encode(response)
        let jsonString = String(data: data, encoding: .utf8)
        completion(jsonString)
      case .failure(let error):
        completion(FlutterError(code: "AlgoliaNativeError", message: error.localizedDescription, details: nil))
      }
    }
  }

}
Next, add the performCall method, which binds the raw Flutter method call to the previously defined search method.
1
2
3
4
5
6
7
8
9
10
11
12
13
14
15
16
17
18
19
20
21
22
23
24
25
26
27
28
29
30
31
32
33
34
35
36
37
class AlgoliaAPIFlutterAdapter {

  let searchClient: SearchClient

  init(applicationID: ApplicationID, apiKey: APIKey) {
    self.searchClient = SearchClient(appID: applicationID, apiKey: apiKey)
  }

  func search(indexName: IndexName, query: String, completion: @escaping FlutterResult) {
    searchClient
    .index(withName: indexName)
    .search(query: "\(query)") { result in
      switch result {
      case .success(let response):
        let data = try! JSONEncoder().encode(response)
        let jsonString = String(data: data, encoding: .utf8)
        completion(jsonString)
      case .failure(let error):
        completion(FlutterError(code: "AlgoliaNativeError", message: error.localizedDescription, details: nil))
      }
    }
  }

  func perform(call: FlutterMethodCall, result: @escaping FlutterResult) {
    switch call.method {
    case "search":
      if let arguments = call.arguments as? [String] {
        search(indexName: IndexName(rawValue: arguments[0]), query: arguments[1], completion: result)
      } else {
        result(FlutterError(code: "AlgoliaNativeError", message: "Missing arguments", details: nil))
      }
    default:
      result(FlutterMethodNotImplemented)
    }
  }

}
The API adapter is ready.
Scroll up to the AppDelegate class definition, and add an instance of AlgoliaAPIFlutterAdapter inside it. The code should look as follows:
1
2
3
4
5
6
7
8
9
10
11
12
13
14
@UIApplicationMain
@objc class AppDelegate: FlutterAppDelegate {

  let algoliaAdapter = AlgoliaAPIFlutterAdapter(applicationID: "latency", apiKey: "1f6fd3a6fb973cb08419fe7d288fa4db")

  override func application(
    _ application: UIApplication,
    didFinishLaunchingWithOptions launchOptions: [UIApplication.LaunchOptionsKey: Any]?
  ) -> Bool {
    GeneratedPluginRegistrant.register(with: self)
    return super.application(application, didFinishLaunchingWithOptions: launchOptions)
  }

}
Define a new Flutter method channel for the main FlutterViewController and set the Algolia adapter instance as its call handler:
1
2
3
4
5
6
7
8
9
10
11
12
13
14
15
16
17
18
@UIApplicationMain
@objc class AppDelegate: FlutterAppDelegate {

  let algoliaAdapter = AlgoliaAPIFlutterAdapter(applicationID: "latency", apiKey: "1f6fd3a6fb973cb08419fe7d288fa4db")

  override func application(
    _ application: UIApplication,
    didFinishLaunchingWithOptions launchOptions: [UIApplication.LaunchOptionsKey: Any]?
  ) -> Bool {
    let controller : FlutterViewController = window?.rootViewController as! FlutterViewController
    let algoliaAPIChannel = FlutterMethodChannel(name: "com.algolia/api", binaryMessenger: controller.binaryMessenger)
    algoliaAPIChannel.setMethodCallHandler(algoliaAdapter.perform(call:result:))

    GeneratedPluginRegistrant.register(with: self)
    return super.application(application, didFinishLaunchingWithOptions: launchOptions)
  }

}
The platform channel is all set, you can access it from the Flutter.
Build a search interface with Flutter
Open ./lib/main.dart, and add the AlgoliaAPI class providing a MethodChannel instance and a convenient search method.
1
2
3
4
5
6
7
8
9
10
11
12
13
14
class AlgoliaAPI {

  static const platform = const MethodChannel('com.algolia/api');

  Future<dynamic> search(String query) async {
    try {
      var response = await platform.invokeMethod('search', ['instant_search', query]);
      return jsonDecode(response);
    } on PlatformException catch (_) {
      return null;
    }
  }

}
Then add a SearchHit class that will represent the search hit. To keep this example simple, it will contain only a name and an image URL field.
Declare a fromJson constructor method for a convenient creation of SearchHit from a JSON string.
1
2
3
4
5
6
7
8
9
10
11
12
class SearchHit {

  final String name;
  final String image;

  SearchHit(this.name, this.image);

  static SearchHit fromJson(Map<String, dynamic> json) {
    return SearchHit(json['name'], json['image']);
  }

}
By scrolling down the main.dart you’ll see a lot of sample code.
Keep it untouched until the _MyHomePageState class.
Completely remove its sample variables and methods declarations.
Then, add the AlgoliaAPI object:
1
AlgoliaAPI algoliaAPI = AlgoliaAPI();
Next, add the _searchText and the _hitsList properties which will keep the state of your query text and the list of hits respectively.
1
2
String _searchText = "";
List<SearchHit> _hitsList = [];
Then, add the _textFieldController that controls and listens to the state of the TextField component you use as the search bar.
1
TextEditingController _textFieldController = TextEditingController();
Add a _getSearchResult function that calls the Algolia API and extracts the hits from the search response.
1
2
3
4
5
6
7
8
9
Future<void> _getSearchResult(String query) async {
  var response = await algoliaAPI.search(query);
  var hitsList = (response['hits'] as List).map((json) {
    return SearchHit.fromJson(json);
  }).toList();
  setState(() {
    _hitsList = hitsList;
  });
}
Override the build method containing the user interface declaration.
The interface will be based on the Scaffold component. Add the AppBar with “Algolia & Flutter” as its title, and the Column component as its body:
1
2
3
4
5
6
7
8
9
10
@override
  Widget build(BuildContext context) {
    return Scaffold(
        appBar: AppBar(
          title: Text('Algolia & Flutter'),
        ),
        body: Column(
            children: <Widget>[
            ]));
  }
The Column’s body consists of two children: the search bar and the hits list.
Start with adding a search bar.
1
2
3
4
5
6
7
8
9
10
11
12
13
14
15
16
17
18
19
20
21
22
23
24
25
26
27
28
29
30
31
@override
  Widget build(BuildContext context) {
    return Scaffold(
        appBar: AppBar(
          title: Text('Algolia & Flutter'),
        ),
        body: Column(
            children: <Widget>[
               Container(
                  padding: EdgeInsets.symmetric(horizontal: 1),
                  height: 44,
                  child: TextField(
                    controller: _textFieldController,
                    decoration: InputDecoration(
                        border: InputBorder.none,
                        hintText: 'Enter a search term',
                        prefixIcon:
                            Icon(Icons.search, color: Colors.deepPurple),
                        suffixIcon: _searchText.isNotEmpty
                            ? IconButton(
                                onPressed: () {
                                  setState(() {
                                    _textFieldController.clear();
                                  });
                                },
                                icon: Icon(Icons.clear),
                              )
                            : null),
                  ))
            ]));
  }
Next, add the hits list widget as the second child of the Column:
1
2
3
4
5
6
7
8
9
10
11
12
13
14
15
16
17
18
19
20
21
22
23
24
25
26
27
28
29
30
31
32
33
34
35
36
37
38
39
40
41
42
43
44
45
46
47
48
49
50
51
@override
Widget build(BuildContext context) {
  return Scaffold(
      appBar: AppBar(
        title: Text('Algolia & Flutter'),
      ),
      body: Column(
        children: <Widget>[
            Container(
                padding: EdgeInsets.symmetric(horizontal: 1),
                height: 44,
                child: TextField(
                  controller: _textFieldController,
                  decoration: InputDecoration(
                      border: InputBorder.none,
                      hintText: 'Enter a search term',
                      prefixIcon:
                          Icon(Icons.search, color: Colors.deepPurple),
                      suffixIcon: _searchText.isNotEmpty
                          ? IconButton(
                              onPressed: () {
                                setState(() {
                                  _textFieldController.clear();
                                });
                              },
                              icon: Icon(Icons.clear),
                            )
                          : null),
                )),
            Expanded(
                child: _hitsList.isEmpty
                    ? Center(child: Text('No results'))
                    : ListView.builder(
                        padding: const EdgeInsets.all(8),
                        itemCount: _hitsList.length,
                        itemBuilder: (BuildContext context, int index) {
                          return Container(
                              height: 50,
                              padding: EdgeInsets.all(8),
                              child: Row(children: <Widget>[
                                Container(
                                    width: 50,
                                    child: Image.network(
                                        '${_hitsList[index].image}')),
                                SizedBox(width: 10),
                                Expanded(
                                    child: Text('${_hitsList[index].name}'))
                              ]));
                        }))
          ]));
}
Override the initState method. Add a TextFieldController listener so it triggers a search request on each keystroke.
You can also trigger an initial empty search from here.
1
2
3
4
5
6
7
8
9
10
11
12
13
@override
void initState() {
  super.initState();
  _textFieldController.addListener(() {
    if (_searchText != _textFieldController.text) {
      setState(() {
        _searchText = _textFieldController.text;
      });
      _getSearchResult(_searchText);
    }
  });
  _getSearchResult('');
}
Finally, override the dispose method to properly remove the TextFieldController instance.
1
2
3
4
5
@override
void dispose() {
  _textFieldController.dispose();
  super.dispose();
}
The final version of your _MyHomePageState class should look as follows:
1
2
3
4
5
6
7
8
9
10
11
12
13
14
15
16
17
18
19
20
21
22
23
24
25
26
27
28
29
30
31
32
33
34
35
36
37
38
39
40
41
42
43
44
45
46
47
48
49
50
51
52
53
54
55
56
57
58
59
60
61
62
63
64
65
66
67
68
69
70
71
72
73
74
75
76
77
78
79
80
81
82
83
84
85
86
87
88
89
90
91
class _MyHomePageState extends State<MyHomePage> {

  AlgoliaAPI algoliaAPI = AlgoliaAPI();

  String _searchText = "";
  List<SearchHit> _hitsList = [];

  TextEditingController _textFieldController = TextEditingController();

  Future<void> _getSearchResult(String query) async {
    var response = await algoliaAPI.search(query);
    var hitsList = (response['hits'] as List).map((json) {
      return SearchHit.fromJson(json);
    }).toList();
    setState(() {
      _hitsList = hitsList;
    });
  }

  @override
  Widget build(BuildContext context) {
    return Scaffold(
        appBar: AppBar(
          title: Text('Algolia & Flutter'),
        ),
        body: Column(
          children: <Widget>[
              Container(
                  padding: EdgeInsets.symmetric(horizontal: 1),
                  height: 44,
                  child: TextField(
                    controller: _textFieldController,
                    decoration: InputDecoration(
                        border: InputBorder.none,
                        hintText: 'Enter a search term',
                        prefixIcon:
                            Icon(Icons.search, color: Colors.deepPurple),
                        suffixIcon: _searchText.isNotEmpty
                            ? IconButton(
                                onPressed: () {
                                  setState(() {
                                    _textFieldController.clear();
                                  });
                                },
                                icon: Icon(Icons.clear),
                              )
                            : null),
                  )),
              Expanded(
                  child: _hitsList.isEmpty
                      ? Center(child: Text('No results'))
                      : ListView.builder(
                          padding: const EdgeInsets.all(8),
                          itemCount: _hitsList.length,
                          itemBuilder: (BuildContext context, int index) {
                            return Container(
                                height: 50,
                                padding: EdgeInsets.all(8),
                                child: Row(children: <Widget>[
                                  Container(
                                      width: 50,
                                      child: Image.network(
                                          '${_hitsList[index].image}')),
                                  SizedBox(width: 10),
                                  Expanded(
                                      child: Text('${_hitsList[index].name}'))
                                ]));
                          }))
            ]));
  }

  @override
  void initState() {
    super.initState();
    _textFieldController.addListener(() {
      if (_searchText != _textFieldController.text) {
        setState(() {
          _searchText = _textFieldController.text;
        });
        _getSearchResult(_searchText);
      }
    });
    _getSearchResult('');
  }

  @override
  void dispose() {
    _textFieldController.dispose();
    super.dispose();
  }
}
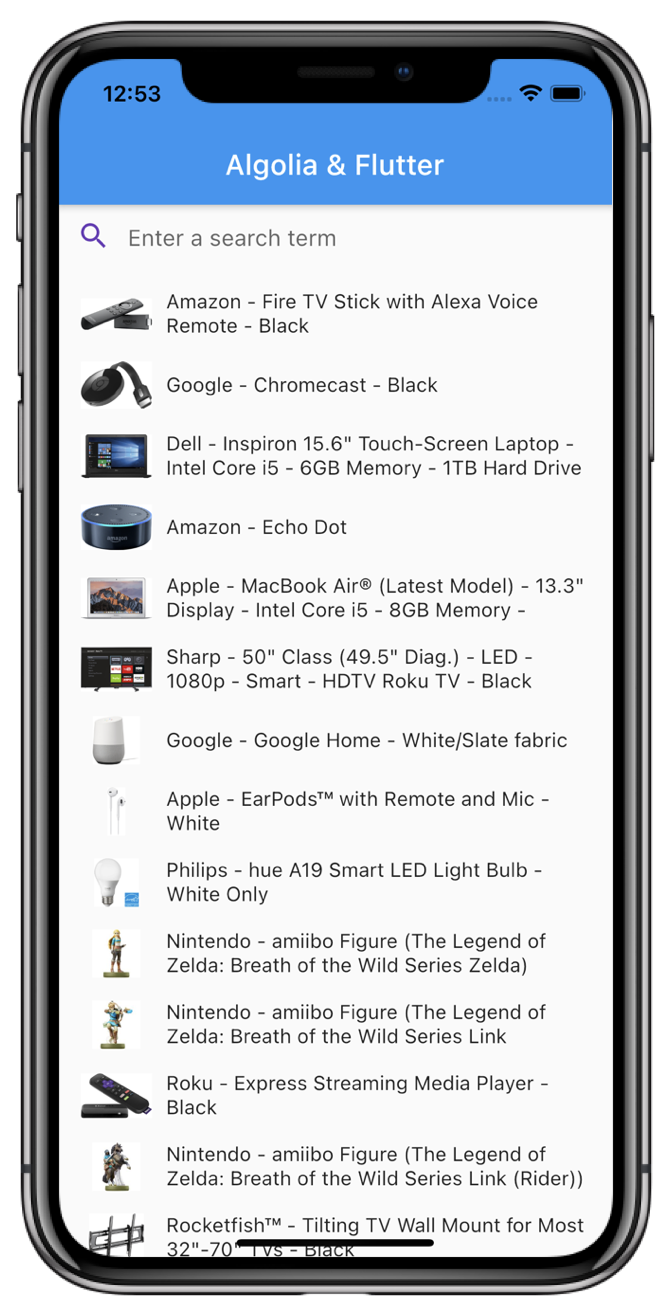
Save your changes in the main.dart file and return back to Xcode. Build and run your application. In the simulator you should see the basic search interface built with Flutter.

What’s next?
This tutorial gives an example of bridging native search with the Swift API client and Flutter using platform channels. Your real application might be way more complex, so you might want to extend this example by adding more search parameters and more API methods.

